• Home
  • YouTube Lessons
  • Patreon Courses
  • 7 Steps to Fingerstyle Guitar
  • Menu
    • Udemy Courses (2018)
    • Free Beginner Guitar Lessons
    • Free Fingerstyle Guitar Lessons
    • Free Fingerpicking Exercises
    • Free Fingerpicking Scales
    • Free Fingerpicking Chords
    • Fingerstyle Questions
  • BlitzGuitar Login
  • Patreon Login

marcocirillo@blitzguitar.com

FINGERSTYLE GUITAR LESSONS

With Marco Cirillo
  • Home
  • YouTube Lessons
  • Patreon Courses
  • 7 Steps to Fingerstyle Guitar
  • Menu
    • Udemy Courses (2018)
    • Free Beginner Guitar Lessons
    • Free Fingerstyle Guitar Lessons
    • Free Fingerpicking Exercises
    • Free Fingerpicking Scales
    • Free Fingerpicking Chords
    • Fingerstyle Questions
  • BlitzGuitar Login
  • Patreon Login
Guitar Lesson: How to Write a Simple Melody on Guitar – Three Steps

Guitar Lesson: How to Write a Simple Melody on Guitar – Three Steps

Mar 28, 2019

Hey guys, today I am going to show you how to write a simple melody on guitar. We are going to learn the three essential steps to writing a melody.

  • Step 1. Find a good chord progression.
  • Step 2. Learn the scale.
  • Step 3. Shape the melody.

To write a melody on the guitar the harmony, melody, and rhythm must work perfectly together. Use at least two chords, then select some of the notes from the scale to come up with a melody that best describes your music idea.

It isn’t as simple as it sounds so in this lesson we are going to work on each step with practical examples so that you have an idea of how it’s done.

The example is in C major key, and the chord progression is C | G | Dm | Am |. The chords are played in different positions on the neck. You can try the exercise with just two chords and add more when you feel ready.

Enjoy this lesson.

Tab Available on Patreon.

Tab Here

Step 1. Find a Good Chord Progression

It’s evident that beautiful chords will inspire you more than boring chords. For this reason, I recommend that you write a good chord progression that gives you goosebumps.

In this exercise, we are going to play a chord progression in C major key. The chords are C – G – Dm – Am.

Each chord is played in a slightly different way than the shapes you probably know. I am playing some extended chords.

The C major chord becomes a Cadd11 chord played with the A string fret 3, G string open, B string fret 6, and E string open. It’s a beautiful chord that already sounds like a melody.

The G major chord becomes a G6, with the low E string fret 3 (I am using the 1st finger). The G string open, B string fret 3 (with the 2nd finger), and the E string open.

The D minor chord becomes a Dm(add9) chord played with the D string open, the G string fret 7, B string fret 6, and E string open.

The last chord, the A minor becomes a beautiful Am(add11) chord with the A string open, G string fret 5, B string fret 3, and the E string open.

What’s the Fingerpicking Pattern?

The fingerpicking pattern is fundamental when you play extended chords with open strings. The remarkable thing about fingerstyle technique is that it allows you to single out some of the notes of the chord and only play the strings that you prefer.

Assign a finger to each string. The thumb always on the bass notes, index on the G string, middle on the B string, and the ring finger on the E string.

If you want to easily memorize the fingerpicking pattern, quickly learn the name of the fingers.

  • Thumb – letter “P.”
  • Index – letter “i”
  • Middle – letter “m”
  • Ring – letter “a.”

For the Cadd11 pluck, the strings with P i m a.  Repeat the pattern four times.

For G6 the pattern will be P i a m.

For the Dm(add9) play a P i m a, and do the same with the Am(add11).

Step 2. Learn the Scale

The scale is an essential melodic tool you’ll ever learn. Why? Because the notes of the melody come from the scale.

In this example, we are playing a chord progression in C major key. Therefore we need to learn the C major scale.

Quick Note! Not all the melodies use this key principle. Sometimes it’s possible to write melodies using other scales that don’t relate to the key at all. 

The notes of the C major scale C D E F G A B C.

The trick is to learn the scale around the chord we are playing so if I am playing the Cadd11 chord using this shape, then I will learn the C major scale in this box.

For example, in this case, the scale starts from the note C, fret five on the G string, and it’s played up until the note A. The scale will then be C D E F G A. I am playing the note E open.

We can also use the open strings. For the G6, I am playing the scale starting from the note C. This position is more stretchy so take it step-by-step.

On the Dm(add9) I am going to play the scale C D E F G A B C starting from the note C on the G string fret 5.

For the Am(add11) I will go back to the same box played for the Cadd11 this time starting from the note C.

Step 3. Shape the Melody

Once you familiarize yourself with the notes of the scale, you can then begin shaping the melody.

How can you write a simple melody?

I wouldn’t start with the melody right away. Instead, play the chord twice. On the next count, play the bass note followed by the melody.

Out of all the notes of the box, I will only select four notes, the G, A, E, and D. I finish on the note D because it’s part of the G6 chord.

I would then play the G major twice followed by the melody. For this chord, I am only playing three notes and slide into the F on the B string fret 6, which is the minor 3rd of the D minor chord. I will play another four notes on this chord, the A, G, F, and E.

The last chord is the A minor which I will learn as we learned it.

Quick Tip! Make the last chord conclusive. It will make the structure clear (for you and the audience).

Try With Different Chord Progression

We can then use the same principle to write a different melody.

In this example we developing the melody on the F major chord, then C major, D minor, and A minor. Notice how the melody is always played with the notes of the C major scale and in the same position of the chord.

Let’s Wrap This Up

I hope you enjoyed this guitar lesson guys.

There are a few important points you should always remember when writing a good melody.

  • 1. Always start with the chord progression. Make it simple and musical.
  • 2. Learn the notes of the scale around the chord shapes. Use open strings if you can.
  • 3. Shape the melody according to the music you play.

Good luck.

Marco

Learn more about how to practice scales on guitar in the next article.

Next Lesson: How to Practice Scales on Guitar.

Check Now!
Beautiful Chords and Melody in DADGAD Tuning

Beautiful Chords and Melody in DADGAD Tuning

Mar 26, 2019

Hey guys, Marco here! Today I am going to show you how to play a beautiful melody in DADGAD tuning.I have been experimenting with this tuning for a while, and I really like the number of harmonic and melodic possibilities that this tuning gives.

But why should you tune your guitar differently than standard tuning?

To be honest with you guys, I was never a huge fan of alternate guitar tuning. I always struggled to get my head around the different positions and open chords and for some reasons I would still go back to playing the same chord shapes.

It was always a mess until I discover a straightforward approach that I call “Forget about everything that you learned and start over again.”

You see, my mistake was that I tried to play the things I already knew in a different tuning, which clearly didn’t work at all.

Instead, start with a blank page and rewrite the chords and scales from scratch.

With the DADGAD tuning you can play awesome stuff with just one finger, (not kidding), and after a day or two, you should be able to switch between the standard tuning and DADGAD easily.

DADGAD tuning is probably one of the most famous guitar tuning out there so you will find a lot of lessons and resources. I actually started with an article from guitar player called “DADGAD for dummies” which I really recommend you read.

The chord progression we are learning today is in B minor key, and it is mainly played with open chords. The melody is mostly played within the chord.

I hope you enjoy this lesson guys.
Tab available on my Patreon page.

Tab Available on Patreon.

Tab Here

How to Tune in DADGAD

Now, the very first thing you should do is to tune your guitar in DADGAD. You can do so by playing the low E string in “D,” keep the 5th, 4th, and 3rd string the same with A, D, and G, then change the B string down to an “A” and the top E string down to a “D.”

There you have it guys. The DADGAD tuning.

DADGAD Tuning

Chords in DADGAD Tuning

Let’s learn the chord progression first. One of the things that really helped me familiarizing myself with the tuning was to stop thinking which chords I was playing.

What I mean by that is, if you play the first B minor chord, it’s inevitable that you are going to play an extended chord because of the different tuning.

At the beginning though, you shouldn’t really stress too much with trying to figure out which chord you are playing.

So, the chord progression goes as follows.

The Bmin chord is played with the 5th string fret 2, 4th and 3rd string fret 4, the 2nd and 1st string open.

The second chord is a basic A major chord played with the 5th string open, the 3rd string fret 2, the 3rd string fret 4, and the 1st string open.

The third chord is a Gadd9 chord. It is played with the 6th string fret 5, 4th, 3rd, and 2nd string open.

The last two chords are just D major and A major. The D major chord is played with the 6th string open, 2nd string fret 5, and 1st string open. The A major with just the 5th string open, 3rd string fret 2, and the 2nd string fret 4.

Melody in DADGAD

The melody can be easily added to the chords. Most of the time, the melody is played within the chords, so it’s all about the way you pluck the strings.

For the Bm chord, start by plucking the A string, then the 4th string with the thumb, and the 3rd, and 1st string together. Then play the melody by plucking the 3rd string fret 4, followed by the 2nd string fret for, and the 1st string open.

On the A major just pluck the A string open simultaneously with the 2nd string followed by the 3rd string. You want to play the bass note one more time before playing this beautiful melody on the 1st string played on the 2nd fret, hammer-on on the 4th fret, pull-off on the 2nd fret, and the 1st string open. You then have to play the 2nd string fret 4 and the 1st string open.

The next chord is G major, which we are going to pluck simultaneously followed by the 3rd string fret 4 and 2nd string fret 4.
The D is played with 6th and 2nd string together followed by the 1st string and the A chord with 5th and 2nd string together followed by the 3rd string.

You can repeat the same thing with the B minor, the A major with the hammer-on and pull-off phrase but the G major will be played with the 6th string played individually, followed by the 3rd string open and the 1st string fret 7. This position is stretchy on the left-hand so, take it step-by-step.

I hammer the bass note without plucking it. I love the percussive sound that the string makes.

The last two chords are the D major played with the 6th string open and the 3rd string fret 7, followed by the 1st string. You can do the same with the A major chord, this time through the bass note is on the 5h string. Play the 3rd string fret 6, then the 1st string open.

The second part is rhythmically and melodically different. We are going to play a melody on the 4th string.

The melody is played on the fret 12, 11, 9 and 7, then fret 5, 7, and 4. Play this melody with the thumb and add the 2nd and 1st string when you feel ready.

Then we have a G major chord played with 6th string fret 5 together with 4th and 3rd string open. Play the 2nd string alone.
You can then play the D major chord with the 6th string open, 5th string fret 5, and 4th string fret 4 followed by the 1st string open.
The last chord is the A major, played with the A string, 2nd string fret 4, 1st string open, and back to the 2nd string.

We will then repeat the same melody with three notes fingerpicking arpeggio on 4th, 1st, and 2nd string played with thumb, middle, and index finger. Try to play it as evenly as possible.

Each note of the melody gets three notes.

When you get to the fret 7, play the three notes plus the bass note on the 6th string. Then do the same on fret 5, 7, and on the fret 4, play the 4th string with the thumb then the 6th string open.

The G major and D major are played just like we learned it followed by the A major chord played with the A string open, 4th and 3rd string fret 2, and 2nd and 1st string open. Strum the chord three times with a downstroke, upstroke, and downstroke again. Strum all the strings.
You can than stum three more times with down, down and up before getting into the last chord which is played with the strumming technique.

Strum the 6th, 5th, and 4th string and play the fret 2, 4, and 5 on the A string followed by the fret 4, 2, and open string on the 6th string.
The last chord is a beautiful Gadd9 chord played with 6th string fret 5, 4th string open, the 3rd string fret 4, and the 2nd and 1st open string.
Strum and let it ring out.

You can then repeat the same Bm7, A, and finish the music on the G chord.

Let’s Wrap This Up

Beautiful and simple melody in DADGAD tuning. I hope you enjoy this lesson guys.

Learn the different chords before you try to come up with your DADGAD chord progression.

Marco.

Next Lesson: 18 Guitar Chords for Beginners

Check Now!
Beautiful Folk Chord Progression on Guitar … and How to Play it

Beautiful Folk Chord Progression on Guitar … and How to Play it

Mar 23, 2019

Hey guys, Marco here welcome back to another fingerpicking lesson. Today I am going to show you how to play a beautiful folk chord progression in B minor.

One thing I like a lot about playing in B minor is that you can play a lot of basic chords such as G major, and A major but also open strings chords like Dadd11, Bm(add11), and G6.

This chord progression can be interpreted in many different ways.
For me, this is excellent music for a journey. The chords are flowing smoothly and the rhythmic pattern played by the thumb creates a lot of movement.

It’s easy to imagine someone driving on a dusty high-road.

On the second part of the song, I added a very interesting percussion played on the guitar body. I basically rubbed my hand on the top body following the rhythm of the song. This technique created a cool sound that reminds me of an old steam train.

I hope you enjoy this lesson guys.

Tab Available on Patreon.

Get the Tab

1. How to Play this Folk Chord Progression

The first step is to learn the chord progression.
We are playing a

Bm(add11), which is played with fret 2 on the A string, 4th and 3rd string fret 4, B string fret 3, and the E string open. You are playing the Root note, 5th, root again, minor 3rd, and perfect 11th.

The second chord is a beautiful Aadd9(6) or a Bm(add9)11/A. It’s played with the A string open, D and G string fret 4, the B string fret 2, and the E string open. If you consider this chord an Aadd9(6) you will play the Root note, the major 6th, the major 9th, major 3rd, and perfect 5th.

The third chord is a simple Em7 played with low E string open, D string fret 2, G string open, B string fret 3, and E string open.

The last chord is a Gadd9(6), played with low E string fret 3, open D, G string fret 2, B string fret 3, and top E string open. This is a very interesting chord with Root, major 3rd, major 9th, perfect 5th, and major 6. A very rich chord.

Play the chords for a while before start practicing the fingerpicking pattern. All the strings should ring out beautifully.

2. Simplified Fingerpicking Pattern

The fingerpicking pattern is the same throughout the entire song.
We are using a technique called ” The Travis picking,” in which the thumb plays two bass notes on a steady rhythm while the index, middle, and ring finger take care of the top strings.

We can break down the arpeggio into two separated steps.

Position the B minor chord and pluck the A string with the thumb followed by the D and B string with thumb and middle finger. Go back to the A string with the thumb again, then hit the G string with the index and the D string with the thumb again.

The pattern isn’t complete, but you could practice the chords with this very first choice. Remember to repeat the pattern twice for each chord.

3. Full Fingerpicking Pattern

You can then complete the fingerpicking pattern by playing the A and top E string with thumb and ring finger, the D string with the thumb, the B string with middle finger, A string with the thumb, G string with index, and finally the last D string with the thumb.

Play the same pattern for the other chords too. Remember that the pluck will always pluck two bass notes.
For the B minor and A chord, the thumb plucks the A string and D string.
For the Em7 and Gadd9, the thumb plucks the low E string and the D string.

4. B Section Opening with Dadd11

There is also another section of the songs which is played with different chords.
The fingerpicking is the same!

You will play a beautiful Dadd11 chord on the A string fret 5, D string fret 7, open G, B string fret 7, and E string open. Use the same pattern.

The next chord is a simple A major played with A string open, and 7, 6, and on the D, G and B string. You will also have to play the top E string open.

Moving on to the E minor chord played in position VII. Play the A string 7, D and G string fret 9, the B string fret 8 and the top E string open.

The last chord of this section is the Bm11. You will play with only half of the fingerpicking pattern. Go all the way to plucking the strings with thumb and ring then play two single notes on the A string fret 2 and 4.

Play the Dadd11 again, the A major and then play this beautiful G6 on the low E string fret 3, D string fret 5, G string fret 4, B and E string open. Play a full pattern and pause on the bass note then play an F#7, fret 2 on the low E string, D string fret 4, G string fret 3, and E string open.

The last chord is Bm11.

Let’s Wrap This Up!

That’s it for today guys. I hope you enjoyed this lesson.
Learn each chord step by step.
You can get the tab, check my Patreon page and subscribe to the channel if you want to keep up with all the upcoming lessons.
See ya!

18 Guitar Chords for Beginners and How to Actually Use Them

18 Guitar Chords for Beginners and How to Actually Use Them

Mar 22, 2019

Did you know that everything that we play on the guitar can be simplified? We can do that with chords, a melody, rhythm, scales, and technique exercises.

In this guitar lesson, I am going to show you how to play and simplify 18 chords for beginners. I am also going to teach you how to practice the chords so that you can finally change chords smoothly and faster.

Each chord has a bunch of exercises that show you how to play the chord in a chord progression. Once you familiarize yourself with these basic chords, you can check this useful article I wrote a while back where I talk about how to play nine beautiful chords on the guitar.

We will learn:

  • Nine simple chords: D, A, G, C, E, F, Am, Em, and Dm.
  • Nine simplified chords: Dsus2, Asus2, G6, Cmaj7, Fmaj7, Am7, Em7, and Dm9.

Don’t worry if you don’t recognize the name of the chord. I will explain in details how to play them step-by-step.

IMPORTANT! A lot of beginners think that practicing simplified chords is a way of cheating. You shouldn’t feel like that. Almost all guitar players play these simplified chords from newbie to pro.    

Learn the Left-Hand Fingers

Before we get started with the chords, have a look at how we name the left-hand fingers.

On guitar, we assign a number for each finger.

  • Number 1 – Index.
  • Number 2 – Middle.
  • Number 3 – Ring.
  • Number 4 – Little finger.

The exercises that you find in these lessons will be played with both strumming and fingerpicking guitar. Listen to the example next to the guitar tab.

The D Major Chord

The first chord is called D major, one of the most simple chords on the guitar.

Let’s learn the chord shape.

D major chord diagram

The number one challenge that a lot of beginners face when they start practicing the D major chord is the muted E string. The 3rd finger, the one who plays the B string fret three, will inevitably sit on the top E string, muting the string.

D major played wrong on guitar

The Simplified D major Chord – Dsus2

I think that practicing the D major chord without fretting the top E string is the best way to learn this chord.

Get rid of the middle finger and play the E string open. Adjust the left-hand angle and play the chords a couple of times.

This is the chord diagram

Dsus2 chord diagram

Also, check the difference between the D and Dsus2 from the pictures below.

Dsus2 Chord on Guitar

WARNING! QUICK MUSIC THEORY LESSON. The sus2 chord is a basic chord played without the 3rd. In this chord, we lower the 3rd down to a 2nd. The notes of the D major chord are D F# A but with the Dsus to you only play D E A. 

How to Practice the D major and Dsus2 Chord

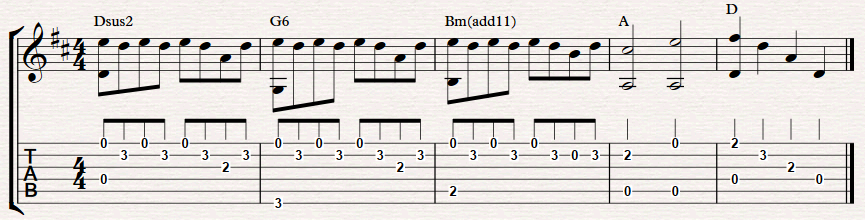
In this example, I am going to show you a straightforward chord progression played with both Dsus2 and D major.

Play the exercise with the fingerpicking technique and pluck one string at a time.

Click the “Play” button to listen to the exercise.

Guitar exercise with D major and Dsus2

The A Major Chord

Moving on to the next basic chord. The A major chord is very simple to play and easy to memorize. You will have to squeeze three fingers in the same fret and play the 4th, 3rd, and 2nd string on fret two.

A major chord diagram

There are two different ways of playing the A major chord. With the finger 1, 2, and 3 or with 2, 3, and 4. Many beginners find the second option more comfortable as it’s easier to position the fingers and avoid the horrible buzzing noise.

A major chord on guitar

The Simplified A major chord – Asus2

Let me show you how to simplify the A major chord by playing the B string open (instead of the 2nd fret).

The Asus2 chord is one of the easiest chords on the guitar. You can play this chord with two fingers only, and it’s indeed the most simple and beautiful chord on the guitar.

Asus2 chord diagram

Check the left-hand position and the difference between the A major and Asus2.

Asus2 chord on guitar

How to Practice the A major and Asus2 Chord

Let me show you this beautiful chord progression in A major using both A major and Asus2.

We are still using the fingerpicking technique which allows us to single out the notes of the chord.

Enjoy this chord progression.

Guitar exercise with A major and Asus2

The G Major Chord

The G major chord is another “Must learn” chord for beginners. It is played in many songs such as “Knocking on Heavens Doors” by Bob Dylan and I “Wish You Were Here” by the Pink Floyd.

Here’s how the chord looks like.

G major chord diagram

There are two different ways of playing the G major chord. The Basic shape and Country shape. With the Country shape, you will add a note on the B string fret three.

G major chord on guitar

The Simplified G major chord – G6

One thing you can do to reduce the fingers stretch is to play the top E string open. By playing the note E, the G major becomes a G6 which has a very particular sound, different from the basic and sus2 chords.

You can play the G6 with both Basic and Country shape.

G6 chord diagram

Learn the G6 chord shape from the picture below.

G6 on guitar

WARNING! QUICK MUSIC THEORY LESSON. The G6 chord is a basic chord played with the extended 6th. The notes of the G major chord are G B D. With the G6 chord you will also play the note E. The notes for the G6 chord are G B D E. 

How to Practice the G major and G6 Chord

In this simple example, I am going to teach you how to practice the G6 and G major chord.

We are going to play the G6 in a beautiful chord progression in C major that has both G and G6 chords.

Guitar exercise with G major and G6

The C Major Chord

In music, we always have examples in C major.  Think about the first scale you learned or the first music theory you take. They all refer to C major.

Now, the C major chord isn’t necessarily the very first chord you’ll learn because it isn’t a simple chord at all. It is stretchy on the left-hand, and it requires a lot of work to achieve a crisp and clear chord change.

The chord looks like this:

C major chord diagram

The most difficult part will be playing the G string open, which is usually muted by the middle finger.

Check how to correctly position the fingers when you play the C major chord.

C major chord on guitar

The Simplified C major chord – Cmaj7

The Cmaj7 is beautiful chord loved by beginners.

It looks like the C major chord but without the first finger on the B string. This chord shape is less stretchy and more comfortable to play with other chords.

To go from C major to Cmaj7 remove the index finger and you are done.

Check the chord diagram below

Cmaj7 chord guitar diagram

And also the right-hand position.

Cmaj7 on guitar

WARNING! QUICK MUSIC THEORY LESSON. The major 7th chord is a basic chord played with 1st, 3rd, and 5th plus the 7th note. For the Cmaj7 the notes are C E G B.

How to Practice the C major and Cmaj7 Chord

We can finally strum some chords. In this simple chord progression, we are going to play a Cmaj7 chord followed by a Fmaj (more later).

The chord progression is played slowly and has a dreamy vibe.

Guitar exercise with C major and Cmaj7

The F Major Chord

The F major chord is the number one chord that every guitar player fear. It’s the dreadful chord guitar players avoid, mainly because it’s played with the infamous bar chord technique.

So, is the F major chord an easy chord for guitar players? The answer is “YES indeed.” But we have to simplify a few things.

The dreadful F major chord played with a six strings bar chord looks like this:

F major chord diagram

If we strum this chord, then there isn’t much we can do. But you learned from the previous chord progressions that we can also use the fingerpicking technique which allows you to single out some of the notes of the chord.

You can learn more about strumming and fingerpicking technique in this article I wrote a while back.

Let me show you a simple way to play the F major chord.

F major chord on guitar with bar chord

The Simplified F major chord – Fmaj7

We can simplify the F major even more by playing the Fmaj7 chord.

This is the Fmaj7 chord diagram.

Fmaj7 chord diagram

This chord is played just like the F major but with the top E string open.

Fmaj7 chord on guitar

It’s another dreamy chord that can be played in many chord progressions.

How to Practice the F major and Fmaj7 Chord

A simple chord progression using the F major and Fmaj7 chord.

The chord progression is in A minor key and involves Am, Fmaj7, C, and G.

Guitar exercise with F major and Fmaj7

The A minor Chord

Let’s finally learn a minor chord. The A minor chord is one the easiest chord on guitar for both strumming and fingerpicking technique.

All the fingers are in one position just like the A major chord, but I find this chord more natural to play.

Just check the difference between the A major and A minor chord.

A minor chord diagram

The only trouble you could have is a dead G string. When you play this chord, lower the thumb and adjust the left-hand position so that you can comfortably press the strings correctly.

A minor chord on guitar

The Simplified A minor chord – Am7

The Am7 chord is played just like the A minor but with the G string open. The chord is played with A string open, D string fret 2, G string open, B string fret 1, and top E string open.

It’s a folky, country chord which can be played in many minor chord progressions.

Am7 chord diagram.

Am7 chord diagram

This is the A minor chord diagram and how to play it.

Am7 chord on guitar

WARNING! QUICK MUSIC THEORY LESSON. The Am7 chord is a basic minor chord played with the notes A, C, and E. To make an A minor 7th chord, add the note G. For this chord, the note G can be played on the open G string.

How to Practice the A minor and Am7 Chord

You can practice this chord in many different ways. In this example, I am going to show you a simple chord progression in fingerstyle guitar.

Guitar exercise with A minor and Am7

The E minor Chord

Another simple chord loved by beginners. The E minor chord is simple and used in thousands of songs.

So, what makes the E minor the most natural chord on the guitar?

First off, the chord shape is simple to memorize. The chord is played with the low E string open, the A and D string fret 2, and the G, B, and top E string open.

Look at how simple this chord looks on a diagram.

E minor chord diagram

You can strum all the six strings and practice simple strumming patterns or pluck the strings with different fingerpicking arpeggios.

This is how the E minor chord looks like.

E minor chord on guitar

There is also a more interesting way of playing this chord.

The Simplified E minor chord – Em7

It can be quite tedious to practice the E minor chord. The chord is simple, but it also sounds pretty dull after a while.

Learn the Em7 shape. Follow the chord diagram below.

Em7 chord diagram

What’s a good way to spice up such a boring music chord? Just learn the Em7 chord in its two most common chord shapes.

Em7 chord on guitar

The second chord, also called Country Em7 work perfectly with chord progressions in G major and E minor.

Let me show you a simple example.

How to Practice the E minor and Em7 Chord

Learn one of the most played chord progressions on guitar, the Em7, G, Dsus4, and A7(sus4). This is the same chord progression played by the band Oasis in the famous song “Wonderwall.”

Guitar exercise with E minor and Em7 chord

The D minor Chord

The D minor chord is indeed one of my favorite chords to play on guitar. I like the simple shape and the note range. I also like the fact that the chord is played in one of my favorite song, Layla by Eric Clapton.

The majority of beginners learn this chord easily. One of the reasons why you could struggle learning this chord is because your fingers can’t stretch enough.

There is a considerably wide stretch between the note on the E and B string. For this reason, the chord can be played with two different fingerings.

D minor chord diagram

Learn how to position your fingers here.

D minor chord on guitar

The Simplified D minor chord – Dm7

This chord shape will drastically reduce the stretch between the E and B string. However, a two strings bar chord is necessary if you want to make this chord easy to play.

Learn the Dm7 chord.

Dm7 chord diagram

The bar chord covers the E and B string fret 1. You will also have to play the G string fret 3.

Dm7 chord shape on guitar

How to Practice the D minor and Dm7 Chord

As for the other chords, the Dm7 chord sounds pretty folk.

Because this is probably the very first time you are dealing with a bar chord, I would recommend that you practice the chord with the fingerpicking technique. This approach makes it easy to play one string at a time.

Enjoy the chord progression.

Guitar exercise with D minor and Dm7

Let’s Wrap This Up

I hope you enjoy this lesson and you are finally able to simplify some of the most common guitar chords for beginners.

As for the other things you learn, always take things step-by-step and practice a chord for a while before moving on to the next one.

The worst approach you can have towards practicing chords is to skim through each chord shape and briefly play each example. Instead, learn one exercise at a time an implement the things you learned in other chord progressions and songs you already play.

Good luck guys.

Next Lesson: How to Practice Scales on Guitar.

Check Now!
Guitar Lesson: What Makes a Good Chord Progression

Guitar Lesson: What Makes a Good Chord Progression

Mar 21, 2019

Hey, guys Marco here welcome to another guitar lesson.

Today I want to talk about chords and chord progressions, and I want to try to answer this question “What makes a good chord progression.”

Now whether you are a musician or not, you agree with me that certain elements make a chord progression good.
It could be because it’s catchy, or sad, or bluesy and reflects an exact state of mind or emotion.

So today we are going to analyze different chord progressions and see why they sound the way they sound and what are the elements that you can apply into your playing that will create the same character or vibe.

Enjoy this lesson.

Tab Available on Patreon!

Tab Here

Chord Progression #1: E minor.

The first chord progression is in E minor.

I played these chords in my previous video “Six chord progressions that will make you cry,” which was my very first viral video on YouTube.
So what are the things that made this chord progression go viral and why did you guys like it so much.

  1. Minor chords with singing 3rd.
  2. Open strings chords.
  3. Express emotions with chords.

1. Minor Chords With Singing 3rd

The minor chords with singing 3rd sound melodic. It just feels like the chords are singing.

The chord progression goes as follows: Em, D, C, G, and D chord but If you play the chords in the first position of the neck, they don’t sound quite the same, and the reason for that is because chords with the singing 3rd have their character and melody.

The E minor, C major, and G major are still basic triads, but because of the interval structure of the chord, they sound amazing and, well, different.

2. Open Strings Chords

The open strings chords create space, harmony, and pianistic interval structure.

Most of the time, when we play a chord on the guitar, we start from the bass note which is, of course, the lowest note of the chord and as we go up the notes are higher and higher in pitch

Now, when a chord is played above the third fret, we can combine fretted notes and open strings just like a basic chord, but the result is different because now the notes are not necessarily only going up.

For this E minor chord, I play the low E string followed by the B note on the D string, which is higher in pitch. The next note though is the open G string, which is lower and another G follows it on the B string fret eight which is higher. The last note is the open E, which is lower in pitch.

The same thing happens with the other chords. With the C major and G major chord, we can double the same notes of the chord, and with the Dadd11 the cluster between the note A on the D string and the open G is what makes this chord so unique.

Now, don’t ask me why but for me this chord sounds more like a piano than a guitar.

3. Express Emotions with Chords

Emotionally this chord progression is great because it expresses an exact feeling. It could be a struggle, a difficult moment, a fight, or a moment of inspiration.

Chord Progression 2: B minor

Moving on to the second chord progression. Let’s check this chord progression in B minor.

The number one thing that I think when I play these chords is “I am going on a journey.”

I picture myself sitting on a train while I am looking outside the window thinking about something. It’s an insanely beautiful chord progression which I took from Paul Davids in one of his videos.

There are a few things that make this chord progression good.

1. The rhythm played by the thumb, which resembles the Travis Picking technique creates a lot of movement and motions. This is why I instantly feel like this is good music for a journey. Even if I change the chord progression, but I keep the same rhythmic fingerpicking pattern it feels the same.

2. The Chords sound pretty folky and rich. They are all extended chords with 7th, 9th, or 11th. We are playing a Bm(add11), a Bm(add9)/A, an Em7 chord, and a Gadd9 chord.
The fingerpicking pattern spreads out through the entire measure.

3. Dynamically the chords are mostly played quietly, and I am emphasizing different beats of the chords. The 1st beat and offbeat, and the 3rd beat.

4. Let the chords ring out beautifully.

Chord Progression #3 – A major

A good chord progression will fire up your emotions. Whether it’s joy, happiness, sadness or fear you know that a chord progression is good when gives you goosebumps.

In this example, I am going to show you one of the saddest chord progression I know. Amazingly enough, this is also the simplest because it’s played with just two chords, the I and minor iii.

So grab your guitar and some tissues.

In this example, we are playing an A major chord followed by a C#m chord.

There are three reasons why this chord progression is good.

1. It’s simple and goes straight to the point. Just think about it. How many people can you make feel sad with only two words? Almost impossible right! But you can do that with two chords.

2. Moving between the two chords isn’t enough. You should single out a few notes from the chords to create a chord/melody harmony that sounds quite, simple, and heartbreaking.

3. The A major is a basic triad played with a bar chord on fret five. The reasons why I don’t play the basic chord in the first position is because I want to have full control over the strings and I don’t want to chord to ring out too much.

The C#m chord is played with the singing 3rd, which works perfectly in this example.

Let’s Wrap This Up

That’s it for today folks. I hope you enjoy this video.
Make sure you learn the examples I played in this video and then create your music.
You can get the tab, check my Patreon page and subscribe to this channel if you want to keep up with all the upcoming lesson.
Have a super day, people.
M

Next Lesson: Beautiful Guitar Chords for Beginners.

Check Now!
Five Guitar Tips that Professional Guitar Players Use all The Time

Five Guitar Tips that Professional Guitar Players Use all The Time

Mar 19, 2019

Why some guitar players sound better than others and how can you become better at playing guitar? In this guitar lesson, I am going to show you five guitar tips that professional guitar players use all the time.

Believe it or not, it isn’t about how many chords, scales, or melodies you know but rather HOW you use them.

There are hundreds of guitar tips that you can learn but in this lesson, we will be focusing on dynamics, strumming, fingerpicking chords, and tone.

Becoming a professional guitar player doesn’t necessarily means you have to be the best guitar player in the world and record selling albums.

For me, becoming a professional guitar player is about learning the things that will make you play differently than most of the guitar players out there and the number of notes you play has nothing to do with that.

We will be learning:

  • Strumming and dynamics.
  • Fingerpicking chords.
  • Left-hand position.
  • Fingerstyle melodies.
  • Vibrato technique.

Enjoy this lesson.

Tab Available on Patreon!

Tab Here


Guitar Lesson – 5 Fingerpicking Patterns for Beginners

Guitar Lesson – 5 Fingerpicking Patterns for Beginners

Mar 16, 2019

Fingerstyle is one of the most creative and beautiful guitar technique. Think about acoustic guitar players such as Tommy Emmanuel, Dan Ross, Preston Reed, and Gabriella Quevedo who explored every aspect of the fingerpicking technique and inspired thousands of guitar players.

Classical and Spanish guitar players also use the fingerpicking technique. Musicians like Andreas Segovia, John Williams, Julian Bream, and Pepe Romero devoted their entire life to expand the fingerpicking repertoire by transcribing beautiful compositions from the past.

Fingerstyle music became more complex over the past few years. Techniques like percussive fingerstyle and tapping have now become a standard that many try to reach.

For these reasons, many beginners feel discouraged. Many of my students frequently ask “Can I start learning guitar with the fingerstyle method? Is the fingerpicking technique difficult for beginners?”

The answer is obviously no! However, you should know HOW to get started the right way.

But how do you get started with the fingerpicking technique and what’s the best fingerpicking pattern for beginners?

In this fingerstyle lesson, we are going to take a look at the top 5 fingerpicking patterns for beginners and how to implement them into musical ideas.

Each pattern has different musical examples that you can practice that will help you familiarize yourself with the fingerpicking technique.

Are you Just Getting Started?

There are two categories of fingerstyle players.

  • Total Beginner: If you just bought a guitar, this is your category!
  • Fingerstyle Beginners: The ones who already play guitar but they never learned the fingerstyle technique. If you know how to play basic chords and strumming, you fall into this category.

There will be six examples for each one of the five fingerpicking patterns. Start with the first three if you are a total beginner.

Naming the Right Hand Fingers

On the guitar tab, you will find an indication as to which fingers you should use to pluck the strings. Classical guitar players adopted this system, and it has been around for many years.

The letters come from the Italian/Spanish language.

Here is how it works:

  • Tumb = Pollice, letter “P”
  • Index = indice, letter “i”
  • Middle = medio, letter “m”
  • Ring = anulare, letter “a”

For the left-hand, follow the number on top of the music stave.

  • Number 1 – index
  • Number 2 – middle
  • Number 3 – ring
  • Number 4 – little finger

Fingerpicking Pattern #1 – Alternate Index and Middle

The fingerpicking pattern number one is called “i-m-i-m.”

This is indeed the most simple and common pattern every guitar players start with. It is simple, intuitive, and works perfectly for simple melodies.

Ex.1 – One String Fingerpicking Melody

In this exercise, we are going to practice the pattern on one string only, the top E string. You can then transpose it to the other strings.

The goal of this exercise is to help you develop strength and finger dexterity.

Fingerpicking Pattern Ex#1 - Melody on One String

Ex.2 – Simple C Major Scale

Let me show you how to practice scales with the fingerpicking technique.

In this example, we will learn the C major scale in one octave.

Use the same fingerpicking pattern “i-m-i-m” throughout. Follow the left-hand fingers on top of the music stave.

Fingerpicking Pattern Ex#2 - Simple Scale

Ex.3 – Symmetrical Exercise

One of the most effective guitar exercises of all time.

This symmetrical pattern will help you develop not only the fingerpicking technique but also left-hand control, speed, and stretch.

Fingerpicking Pattern Ex#3 - Symmetrical Pattern

Ex.4 – Beautiful Fingerstyle Melody

One of the awesome things about the fingerstyle technique is the fact that we can combine chords and melody.

Learn how to play this simple melody in A minor using the “i-m-i-m” fingerpicking pattern.

We will also pluck the bass note with the thumb.

Fingerpicking Pattern Ex#4 - Simple Melody

Ex.5 – Two Octaves Scale

Once you familiarize yourself with the plucking technique, you should start practicing two octaves scales.

Learn the G major scale below. Remember to follow the left-hand fingers on top of the music score.

Fingerpicking Pattern Ex#5 - Two Octaves Scale

Ex.6 – Three Fingers Exercise

Let’s challenge the left-hand by adding more notes to this symmetrical exercise.

Try the 1 2 3 4 patterns on three strings. This exercise will challenge your fingers quite a lot.

Take it step-by-step and stop if you feel pain in your wrist or fingers.

Fingerpicking Pattern Ex#6 - Three Fingers Exercise

Fingerpicking Pattern #2 – The P i m a

The P i m a is the most common fingerpicking pattern on guitar.

We are going to learn a few chord progressions as well as combining the P i m a pattern with the alternate fingering.

If you are a beginner, start with the first three patterns.

Ex.1 – Two Simple Chords

In this first example, learn this chord progression in A minor.

Pluck the bass note with the thumb and assign a finger to each string. Pluck the G string with the index finger, the B string with the middle, and the top E string with the ring finger.

The two chords are A minor and E major.

Fingerpicking Pattern Ex#1 - Chords in A minor

Ex.2 – P i m a Reverse

Each fingerpicking pattern can be played reversed.

The reverse of “P i m a” is “a m i P.” This pattern isn’t musical at all, so I decided to change it into P a m i.

Learn this simple chord progression in D major,

Fingerpicking Pattern Ex#2 - D major

Ex.3 – P i m a together

Another awesome variation for the P i m a pattern is to pluck the strings simultaneously.

This pattern works perfectly for rhythmic chords and can be used in many different ways.

In this example for beginners, we are going to pluck together chords in G major key.

Follow the right-hand pattern on the tab.

Ex.4 – P i m a with Intermediate Chords

With such a simple fingerpicking pattern it can be boring to practice things.

Don’t be fooled by the simplicity of this pattern. We can add a beautiful chord progression that will make you love this pattern.

The chords are in E minor key.

Fingerpicking Pattern Ex#4 - P i m a with intermediate chords

Ex.5 – P i m a With Percussive Pattern

Another great thing you can easily add with this pattern is the percussion.

There are a lot of different percussive techniques on guitar, but we will stick with the most simple one called “thumb slap.”

With the thumb slap technique, you strike the bass strings with the thumb while playing the chords. The sound is similar to the snare drum.

This is a simple example using this percussive technique.

Fingerpicking Pattern Ex#5 - Pluck strings together with thumb slap technique

Ex.6 – P i m a With Different Bass Notes

The last example will have the thumb plucking on two different bass strings.

I recommend that you hold the chords down while you pluck the strings and let it ring out beautifully. Also, try to emphasize the bass notes by playing them louder than the rest of the chords.

Fingerpicking Pattern Ex#6 - P i m a with different bass notes

Fingerpicking Pattern #3 – P i m a m i

Let’s explore the fingerstyle pattern in six that every beginner should learn. It’s called P i m a m i or sextuplets (six notes).

This pattern can be broken down into two patterns of three. The way you count each pattern will now be 1 2 3 – 1 2 3 as opposed as the patterns in four which we count like 1 2 3 4 – 1 2 3 4.

The P i m a m i pattern can be quite confusing at first especially if you try to use a metronome. You will now have to play three notes per beat which aren’t the most natural thing to do.

Spend a few minutes counting 1 2 3 – 1 2 3 while tapping the foot on the first count only.

From now, there will be three examples of each pattern.

Ex.1 – Minor Chord Progression

In this first example, I am going to show you a straightforward chord progression in E minor played mostly with open strings.

The melody is played on the top E string should be louder than the accompaniment.

Fingerpicking Pattern Ex#1 - Six notes fingerpicking pattern in E minor

Ex.2 – Folk Chord Progression

This pattern works perfectly with folk and country chord progressions.

This is an example in A minor.

Fingerpicking Pattern Ex#2 - Six notes fingerpicking pattern A minor folk

Ex. 3 – The Six + Three Pattern

A common variation could be playing the P i m a m i followed by the P i m P i m pattern.

An easy way to spice things up.

Fingerpicking Pattern Ex#3 - combined fingerpicking patterns

Fingerpicking Pattern #4 – Combined Patterns

Even beginners should learn how to combine different fingerpicking patterns. The fact that you are just starting with fingerstyle doesn’t mean you shouldn’t try something challenging.

By combining different patterns, you will also learn the amazing possibilities that fingerstyle offer not only harmonically but also rhythmically and melodically.

You will learn how to combine chords with melody and how to change the rhythm of a pattern simply.

Good luck!

Ex. 1 – P i m i a i m i + Melody in “i-m”

In this example, we alternate chords and melody. The pattern is rhythmically very simple as we only play sixteenth notes.

Assing a finger to each string to each string and alternate when you play the melody.

The chord progression is in A Minor.

Fingerpicking Pattern Ex#1 - P i m i a i m i + melody

Ex. 2 – P i m a m i + Melody in “m-i”

A pattern in six is always challenging at first.

In this example, we are going to play an arpeggio in E minor followed by a melody on the E string.

The long notes at the end of the melody should help you transition between the chords easily.

Speed isn’t important so play slowly and focus on chord change and tone.


Fingerpicking Pattern Ex#2 - P i m a m i + melody

Fingerpicking Pattern  #5 – The Tremolo

The tremolo is a popular Classical and Spanish technique. It sustains the melody and creates a continuous sound similar to a fast picking.

This technique is achieved by playing three notes with the ring, middle, and index finger on one string while the thumb takes care of the bass note.

On the music score, the tremolo looks like that:

Fingerpicking pattern with tremolo

One of the reasons I teach the tremolo to beginners is because it develops many aspects of the fingerpicking technique at once.

By practicing this technique, you will improve your control, speed, plucking, rhythm, timing, and skills.

But how do we get started with the tremolo technique?

Let me show you how.

Ex. 1 – Tremolo Technique Definition

We can apply the tremolo on chords and melody.

In this exercise, I am going to show you how to familiarize yourself with the technique by using a simple chord progression.

Hold the chord down while playing the tremolo.

Ex. 2 – Simplified Tremolo

There is a way to simplify the tremolo by removing one note from the group (usually the ring finger).

In this case, we only play with thumb, index, and middle.

The tremolo is now in three and not in four anymore.

Fingerpicking pattern #2 - Simplified tremolo

Let’s Wrap This Up

I hope you enjoyed these fingerpicking patterns for beginners.

I know that some of the examples can be quite challenging for a total beginner. I also know that by practicing something that feels difficult you have more chances to make an improvement.

Don’t get me wrong! I am not saying you should practice things that are way above your level. But a little challenge keeps you motivated and determined.

Take each example as a separate exercise and spend time practicing each exercise.

When you feel ready, check the next lesson below and learn 11 Ways to Practice Scales on Guitar!

Good luck.

Marco.

Next Lesson: How to Practice Scales

Check Now!


The Most Simple Fingerpicking Pattern on Guitar

The Most Simple Fingerpicking Pattern on Guitar

Mar 15, 2019

Hey guys, Marco here for another fingerstyle lesson. Today I am going to show you the most simple fingerpicking pattern on guitar played with beautiful chords.

This is one of the top 5 essential fingerpicking patterns every guitar player should know. It is also the very first pattern my teacher gave me when I first started playing guitar in 1994.

A simple fingerpicking pattern is worth nothing without a beautiful chord progression as the right-hand only controls the tone, volume, and dynamics.

The left-hand is responsible for playing these amazing chords, and we have to be smart enough to pick the right keys.

In this lesson, I am making it clear that not all the key sound good on guitar.

Think about the F major, G minor, Eb minor key. These keys don’t give you the same chordal possibilities as the E major, B minor, or D major key.

Today we are learning something in E major. A very simple chord progression with beautiful chords and melody.

When you have such beautiful chords, the fingerpicking pattern can be as simple as possible. You don’t need to play crazy stuff at all.

The pattern is called Pima.

I bet you used it at least once in your life.

Enjoy this lesson.

Tab Available on Patreon!

Tab Here

9 Beautiful Chords on Guitar and How to Actually Play Them

9 Beautiful Chords on Guitar and How to Actually Play Them

Mar 14, 2019

Chords are probably the very first thing guitar players learn when they start playing guitar.

Think about the hundreds of songs you can play with a handful of chords. If you use a guitar capo, things are even easier because you can transpose the chords in different positions of the guitar neck.

It sounds good, right?

The problem is, playing the same chords over and over again is the main reason why you get bored of playing the guitar.

All the songs sound the same, and after a while you find yourself thinking “How can I learn new chords?” or “When can I learn intermediate chords?”

In this fingerstyle guitar lesson, I am going to show you nine beautiful chords on guitar and how to actually play them.

Once I show you the chord, I will demonstrate how to play it in a beautiful chord progression.

These are the beautiful chords we will learn:

  1. Cadd9
  2. Gsus4
  3. Em9
  4. Am(add9)
  5. Amaj7
  6. Dsus2 and Dsus4
  7. Bb13
  8. C#m9
  9. Emaj7

About Chords and Extended Chords

Before we start playing any chords, you need to learn about extended chords.

The list of chords we are about to learn includes many extended chords. An extended chord is a simple chord (or basic chord) played with additional notes from the scale.

The difference between basic and extended chords is that:

  • A basic chord has three note only, the root note, 3rd, and 5th. The root note gives the name to the chord; the 3rd determines if the chord is major or minor, and the 5th is the perfect, diminished or augmented interval inside the chord.
  • Extended notes such as 7th, 9th, 11th, and 13th add beautiful colors to the basic chords.

Enjoy these chords guys.

1. Cadd9 Chord

The Cadd9 chord is an extended chord that can be used in the C major and G major key as well as relative minor keys such as A minor or E minor.

It’s a basic triad with the extended 9th.

The notes of the Cadd9 chord are C E G D (root, major 3rd, perfect 5th, major 9th)

This is the Cadd9 chord diagram:

Cadd9 chord diagram

The Cadd9 chord is a beautiful open chord that fits perfectly between chords such as G or E minor. The additional note D creates a resonating cluster with the top E string open.

The chord progression I am about to show you is Cadd9 | G | Am | Fadd9|. The F chord is also played as an add9 chord.

2. Gsus4 Chord

The Gsus4 is a very popular chord on the guitar.

Also called “Suspended” chord, the Sus4 is an extended chord played with the root note, 4th, and 5th.

Because this chord doesn’t have the 3rd, it can be neither major or minor. That explained the “Suspended” label.

The notes of the Gsus4 chord are G C D (Root, perfect 4th, and perfect 5th).

This is the Gsus4 chord diagram:

Gsus4 chord diagram

One of the things I like a lot about the Gsus4 chord is that it’s easy to create simple voicings within the chords.

We can move the 4th back to the 3rd and use the voicing to create a simple melodic idea.

Check the example below.

Gsus4 Chord

3. Em9 Chord

The Em9 chord I am about to show you is indeed one of the most popular chords on the guitar.

The cluster between the F# and G is pretty much the reason why I love this chord so much.

The m9 is a chord with root, minor 3rd, perfect 5th, minor 7th, and major 9th. We add the minor 7th even though it doesn’t show in the chord name.

The notes of the Em9 chord are E G B D F#.

This is the Em9 chord diagram:

Em9 chord diagram

As I was saying, I love the cluster between the note F# and G and between the note D and E.

With this chord we can come up with a simple yet beautiful chord progression like this one: Em9 | Cadd9 | G | D |

Check the example below.

Em9 Chord

4. Am(add9) Chord

The Am(add9) chord is another great chord that will take you from beginner to intermediate level.

This chord can be quite stretchy on the little finger, so I highly recommend that position your left hand correctly (more info in this article).

The add9 chord is a basic chord played with the major 9th. The notes of the Am(add9) chord are A C E B (Root, minor 3rd, perfect 5th, and major 9th).

This is the Am(add9) chord diagram:

Am(add9) chord diagram

I love the exotic sound of the Am(add9) chord. Once you overcome the initial struggle, you will find yourself playing this chord over and over again.

The chord progression is Am(add9) | Am(add9)/G  | Fmaj7 | % |. Repeat the Fmaj7 for two measure.

Am(add9) Chord

5. Amaj7 Chord

There is one word that best describes the Amaj7 chord, and this is “Dreamy.”

The maj7 is indeed one of the most satisfying chords family to explore, learn, and put into practice.

The Amaj7 chord is a basic chord with the extended 7th. The notes are A C# E G# (Root, major 3rd, perfect 5th, and major 7th).

This is the Amaj7 chord diagram:

Amaj7 chord diagram

It’s easy to write a beautiful chord progression when you work with such an amazing chord.

In this example, we are going to play Amaj7 | Dmaj7 | Amaj7 | Esus4 |.

Amaj7 chord

6. Dsus2 and Dsus4

Let’s explore more suspended chords in D major key.

You already learned that the suspended chord is a chord played without the 3rd.

The difference between the Sus2 and Sus4 chord is that

  • With the Sus2 we lower the 3rd of the chord down to the 2nd.
  • With the Sus4 we raise the 3rd of the chord to the 4th.

The notes for the Dsus2 are D E A (root, major 2nd, and perfect 5th). The notes for the Dsus4 are D G A (Root, perfect 4th, perfect 5th).

This is the chord diagram of both chords.

Dsus2 and Dsus4 chord diagram

Using both DSus2 and DSus4 in the same chord progression make it easy to write awesome chord progressions. You can actually write a song with just these two chords.

Let me show you an example.

Dsus2 and Dsus4 Chord

7. Bb13 Chord

Let’s explore a Jazzy chord progression with the Bb13 chord.

The 13th chords are extended chords played with root, 3, 5, 7, and 13. Just like the Em9 chord, the Bb13 will also have the 7th.

For the Bb13 the notes are Bb D F Ab G (Root, major 3rd, perfect 4th, minor 7th, and major 13th).

This is the chord diagram:

With such a jazzy chord we can’t help but playing jazzy chord progressions.

In this example, we are going to play Ebm9 | Bb13 | Dbmaj7 | Dbmaj9 |. Some of these chords are stretchy so take it step-by-step.

Bb13 chord

8. C#m9 Chord

Let me show you one of my favorite chord on the guitar, the C#m9.

This chord is insanely beautiful, and it can be played with both strumming and fingerpicking technique. It’s a basic chord with the extended 7th and 9th.

The notes of the C#m9 chord are C# E G# B D# (Root, minor 3rd, perfect 5th, minor 7th, and major 9th).

This is the diagram of this beautiful chord:

C#m9 chord diagram

This chord works beautifully with chords such as A, E, F#m, and B major. If we also add extensions to these chords, the result is guaranteed.

This is a chord progression with the C#m9 chord.

C#m9 chord

9. Emaj7 Chord

Last but not least the Emaj7 chord made it to this awesome list.

This chord is a basic chord with the extended major 7th.

The notes are E G# B D# (Root, major 3rd, perfect 5th, and major 7th).

This is the diagram for the Emaj7 chord:

Emaj7 chord diagram

The Emaj7 chord is a beautiful dreamy chord that can be played along with the Amaj7, C#m9, or B major. In this example, we are going to focus on a simple example using Emaj | Amaj |x2

Emaj7 chord

Let’s Wrap This Up

I hope you enjoyed learning these beautiful chords.

The goal for this lesson is to show you that you can quickly implement beautiful chords into your playing as long as you put them into practice.

Good luck with this lesson.

Next Lesson: Fingerstyle vs Strumming

Watch Now
The Five Notes that Will Make you Happy – Pentatonic Fingerstyle Melodies

The Five Notes that Will Make you Happy – Pentatonic Fingerstyle Melodies

Mar 13, 2019

The Pentatonic is a music scale that contains five notes.

It is indeed one of the most popular scales on the guitar and also one of the simplest to memorize.

There are thousands of articles and lessons about this useful scale, so today I am going to take you to an exciting guitar trip to explore three possible ways of using this scale.

You will learn:

  • The E major pentatonic scale and how to play it melodically. I am going to show you how to use the scale horizontally in three different positions.
  • The A minor scale and how to use it rhythmically. We are going to talk about the riff and how to repeat the same musical idea to create a constant groove.
  • The A major and A minor pentatonic scale played over a twelve-bar blues. We will mix both scales in a simple yet beautiful blues solo.

There are many things about the Pentatonic scale that you can learn in this lesson. If you are searching for practical examples of how to implement this scale into your fingerstyle, you will probably enjoy this lesson.

As always, take things step-by-step and learn one musical idea at a time.

Good luck!

Tab Available on Patreon!

Tab Here


  • 1
  • 2
  • …
  • 4
  • 5
  • 6
  • 7
  • 8
Check my Premium Lessons on Patreon!
Acoustic Steps Fingerstyle Guitar Book

Privacy Policy

Cookie Policy

Terms and Conditions

© Copyright 2021 BlitzGuitar.com

  • Home
  • YouTube Lessons
  • Patreon Courses
  • 7 Steps to Fingerstyle Guitar
  • Menu
    • Udemy Courses (2018)
    • Free Beginner Guitar Lessons
    • Free Fingerstyle Guitar Lessons
    • Free Fingerpicking Exercises
    • Free Fingerpicking Scales
    • Free Fingerpicking Chords
    • Fingerstyle Questions
  • BlitzGuitar Login
  • Patreon Login