Use this Melody in E minor to Improve Fingerstyle Technique.
Beginner Guitar Melody
Hey, guys, today I want to talk to you about improving fingerstyle technique with simple, musical, and effective exercises that are fun to play.
If you want to improve your technique, you have to practice. We all know that there is a massive difference between practicing and playing.
Practicing requires discipline, patience, and self-awareness. It would help if you also had a solid routine and focus. Playing is more instinctual and requires less focus.
Playing is a reward from practicing.
When I was practicing 6-7 hours a day, I remember thinking, “30 more minutes of practice, then I can finally play!”
My question is, “Can you combine practicing and playing?”
I started teaching in 2006, and my first year was a disaster. I lost a ton of students, and I was blaming it on them. I thought they didn’t want to practice, so it was their fault.
It took me a while to realize that the majority of people don’t care about practicing. They want to play! I realized they didn’t have 6-7 hours a day to practice.
I was selling them something that didn’t fit their lifestyle.
I changed my teaching approach in 2007, and it was the best thing I did in my life.
I would write tons of musical ideas and turn them into exercises. Each musical idea would tackle a specific technique.
Today we will focus on a practical idea in E minor that will help you develop your alternate fingering.
I hope you enjoy it!
The Video
Fingerstyle Pattern
In this fingerstyle exercise, we will be working on a symmetrical pattern that will help you with alternate fingering and finger dexterity.
The pattern is performed on two strings, B and E string, with the index finger plucking the B string and the middle finger plucking the E string.
Here’s the fingerstyle pattern we will be focusing on.
Notice that the melody will be always played on the second string.
The Melody
I highly recommend to practice the melody separately.
If you are a beginner, it is advisable to split the exercise into different steps and learn the melody. Then once you feel comfortable, move on to the next step and add the E open string.
Practicing using this system will help you to improve the fingerstyle technique faster and with less effort.
Chord Progression
One of the things I love about this fingerstyle exercise is the chord progression.
Guitar players love the E minor key. There are so many possibilities and fun patterns to play in E minor, and this exercise is the right example.
The chord progressions go as follows: Em – C – D – Em. The second part of the chord progression is C – D – Em – G/B – C – D – Em.
Today I want to show you a new way of considering chords and triads on guitar with the concept of spread triads vs. close triads.
The triad is the most basic chord in music.
When you play a basic C major chord (and any other chord), you are playing a triad, a set of three notes from the major scale. The first note is called the root note, then the 3rd and 5th are added to complete the chord.
A triad of C major will have three notes C, E, and G. You can play these three notes in any order.
There is a very creative approach in which one of the triad notes can be played one octave higher. This approach is called the “Spread triad.”
I want to show you how they work!
We will be playing spread triads over a straightforward chord progression in C major.
For some of you, this is a new concept so take it step by step and practice one chord shape.
Let’s get started.
The Video
Spread Triads vs. Closed Triads
One of the easiest ways to go from close-triads to spread-triads is to raise the second note of any close-triad by one octave.
Check the example below.
Example 1
The C major triad II inversion is a closed triad with the notes positioned as G, C, and E. The G note is on the bass, so we call that II inversion.
We then play the same triad but with the notes positioned as G, E, and C. The C notes are now played one octave higher, so we call it “Spread triad.”
The notes are the same, but the sound of the chord is completely different.
Example 2
In this example, we are checking out an F major triad.
We start with a close triad played in I inversion with the note positioned as A, C, and F.
Then we change the C note position, and the triad becomes A, F, and C.
Hello guys, today I want to show you how to make a melody sound sadder than sad using the major 6th and minor 6th interval.
As you probably know, I really love to transform feelings into musical ideas, so today, we will take a look at what happens when you harmonize a simple melody in 6th.
We will start the lesson by learning a straightforward melody in A minor. The melody is mainly played on one string and with bass notes only.
Then we will double the melody using a lower note that matches the distance on a major 6th or minor 6th.
This interval will make the melody really sad/melancholic sounding.
If you are a beginner, start with the simple melody, then move on to the next step and double the line with the additional note.
Grab your guitar, and let’s get started.
The Video
Step 1
Melody and Bass note
We will start by learning the simple melody on one string as well as the bass note.
There are four notes for each chord.
The chord progression goes as follows: Am – F – C – G
You can really take the exercise step by step and learn the melody first before adding the bass note. Also, I highly recommend that you follow the left-hand fingering I suggest in the video so that when we double the melody, the left-hand fingering is already in place.
This is the simple melody played with a bass note only.
Step 2
Double the Melody
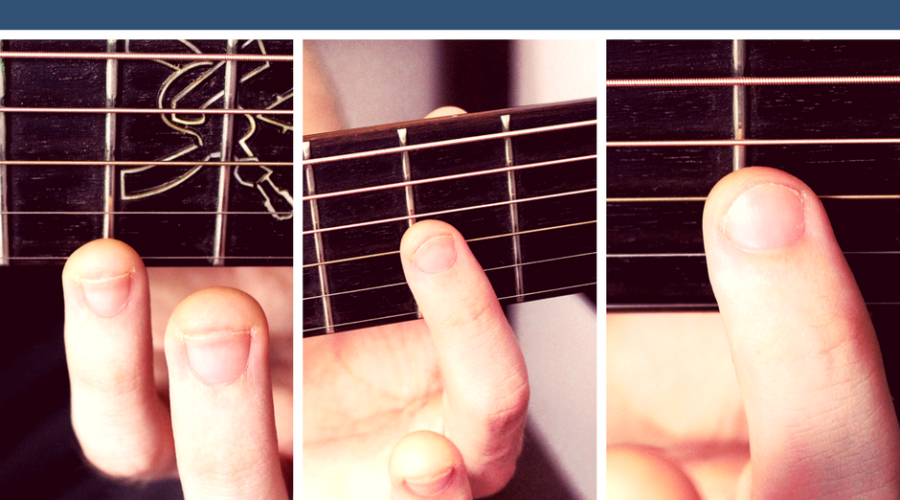
The next step would be harmonizing the melody using the major and minor 6th intervals.
This way of playing is more challenging as it requires finger stretch, finger dexterity, and control, so if you are a beginner, I would recommend trying to learn one chord at a time.
In the video, I explain the left hand fingering slowly, so make sure you follow that.
6 Sad Chord Progressions that Will Make you Melancholic!
Hey Guys, I hope you are having a fantastic day.
Today I want to share a few ideas I have been playing around with you for the last couple of days.
I called it “6 Sad Chord Progressions that will make you feel Melancholic”.
There are few ideas here that I really love, so I am super excited to share them with you guys.
Three things you should know about these chord progressions.
I just came up with a new beautiful chord in D minor. You can hear this chord on the first chord progression. The first chord is a Dmin(add9) with the 4th open, 3rd string fret 2 (A), 2nd string fret 6 (F), and 1st string open. Currently, my favorite chord.
I recorded the whole thing today, but I only had five chord progressions ready. The chord progression number 6 was improvised on the spot. Not bad sounding at all.
Today I had my prenup shooting for my wedding. I was super happy, so it wasn’t easy to record 6 sad chord progressions hehe.
Today I want to share a straightforward trick with you that you can use to create amazing chords on the guitar with minimal effort.
This approach is mind-blowing because it can open the door to hundreds of different chords and chord progression that sound different than anything you already play.
The goal is to keep the same chord while changing the bass note only.
This way of playing is widely used in Pop music. You can hear the chord changing, but the guitar still plays the same three notes.
The truth is, this type of guitar playing sounds awesome.
We will be working on many amazing chords in E major, and there will be two different examples set over a simple chord progression.
Some of the chords will be stretchy and challenging, so as always, make sure you take things step by step.
Once you feel ready, try to come up with your own chords and really experiment with different progressions, keys, and bass notes.
I hope you get inspired.
Grab your guitar, and let’s get started.
The Video
The Chord Progression
One thing essential you want to understand to get the exercise right is the difference between the chords and the bass.
The chords will be played on the top three strings (G, B, and E), while the Bass is always played with the thumb on the bottom three strings (D, A, and E).
This is such an important aspect to understand because it will help you to structure the exercise correctly.
The chords are E – C#m – A – B.
The Plucking Pattern
The next step would be memorizing the fingerstyle pattern.
As we are mainly focusing on the left hand, I decided to keep the plucking pattern very simple.
This is the plucking pattern: P i m i a i m i (Thumb, index, middle, index, ring, index, middle, index)
Example 1
Easy chord progression on position I. The chords are played on 3rd and 2nd string within the same fret.
Each plucking pattern should be repeated two times.
I really love the fact that even though the chord on the top three strings stays the same, we can transform it and create amazing chords that sound beautiful with a different bass note.
One of my favorites will be the Aadd9(#11), which sounds amazing and suspended.
Example 2
The second chord progression is slightly more challenging because of the finger stretch on the B chord.
We are in a high position of the neck for the other three chords. The finger stretch shouldn’t be a problem.
The chords played in such a high position are awesome when you combine them with an open string. The E open string really creates a beautiful cluster that is only possible in this special key.
The B chord is extremely stretchy, and I really apologize, guys, but there wasn’t any other option available.
Hey guys, welcome to another super fingerstyle guitar lesson for beginners.
Today I want to share with you this simple fingerstyle melody I wrote a while ago for one of my Skype students who was struggling with the fingerstyle technique.
Some people struggle with plucking, especially at the beginning, and while the left hand easily develops strength and stretch, the right hand can be a real pain to deal with.
I wrote these classical exercises to practice a simple fingerstyle melody using only thumb and fingers.
As you’ll see, the melody is mostly played on the first E string, so it’s easy to visualize on the neck, and the plucking pattern is easy and straightforward.
There are a few challenging moments, but they are necessary if you really want to take a step forward in your technique.
As always, guys, make sure you take things step by step and focus on coordination, timing, and overall performance.
Once you feel comfortable with the notes, spend time working on the tone and dynamics.
Good luck!
The Video
How to Practice
Let me give you a few tips on approaching such a melody and how to get the best out of it.
It’s a straightforward fingerstyle melody that you can play for yourself and friends and family.
The more you play in front of people, the more your confidence grows and your technique and motivations.
I love to write practical exercises that sound musical because they sound like you are playing a song, so you are much more likely to practice and play the exercises if you feel like “performing” a piece.
How to Pluck the Strings
You really have to follow one rule if you want to take your fingerstyle to the next level, and this is “Alternate fingering.”
It would help if you never doubled/triple pluck with the same fingers, and this exercise is no exception.
Make sure you keep alternating the plucking fingers.
The Melody
The melody is mainly played on the E string. There are few challenging parts where the melody will be played on the higher part of the neck so take it to step by step.
It is of paramount importance that you always use all four fingers (1,2,3,4), and I highly recommend you follow the same plucking hand fingering I use.
Hey, guys, today I want to help you learn how to play natural harmonics on acoustic guitar.
Natural harmonics are beautiful sounding notes that you can play on Classical, Acoustic or Electric guitar.
Their sound is clear, bell-like, and beautiful to listen to. If you combine two or more natural harmonics, the effect is mesmerizing, and it will instantly capture the listener’s attention.
Today I want to share this easy exercise with you that will help you familiarize yourself with natural harmonics so that you finally integrate this concept into your playing.
There will be two different levels. The first level is natural harmonics only; then, once you feel ready, you can move on to the second level and add the bass note.
We will be playing the natural harmonics on fret V, VII, and XII.
I am super excited so let’s get started.
Grab your guitar and play along.
The Video
How to Play Natural Harmonics
Gently touch the strings.
Let me show you how to play natural harmonics on guitar.
The first step is to learn where you can find the natural harmonics on the guitar. For this video, we will play the harmonics on fret V, VII, and XII.
Check the first bard of the exercise as you can see, you have 5th fret on 3rd string.
Press down the 5th fret on the 3rd string and play the note, then release the pressure but hold the finger on the string, slowly slide the finger towards the fret wire on the right side (within the 5th fret). Start plucking the string until you hear the bell-like sound that is so characteristic of the natural harmonics.
Once you feel comfortable, try with the second note on the 2nd string fret VII and practice slowly to get a clear sound.
Watch the Video
The best way to learn how to perform Natural harmonics is to really watch how other guitar players play them.
Watch this tutorial several times before moving on to other tutorials.
Today we are focusing on a super creative technique called tremolo. This technique is widely used in classical, Spanish, and modern music.
Many guitar players think that the tremolo is only used in Classical music, and its main purpose is to make the melody sound more “alive” and sweet.
Let’s do the exact opposite.
I will show you how you can use the tremolo technique over chords (and not a melody) on the Acoustic guitar.
I will also make it easy for you and break it down into four simple steps so that anyone can slowly improve this technique and use it fluently.
Let me tell you more about the four steps:
Learn the chord progression.
Alternate chords with 1st string.
Practice the simplified three notes tremolo
Learn the ultimate tremolo.
Good luck with that, guys.
Let’s get started.
The Video
What’s the Tremolo?
In a few words
There are many different guitar techniques, but only one captures the audience’s attention, like the Tremolo.
Simply put, the tremolo technique is a right-hand technique where the ring, middle, and index finger play on one string sequentially.
The thumb is always the finger that starts the sequence, followed by the ring, middle, and index.
Step 1
The Chord Progression
One thing essential about practicing a specific right-hand technique, such as the tremolo, is to make sure you know exactly what to play with the left hand.
It would be tough to practice the tremolo if you don’t know which chords to play.
We will be working on a straightforward chord progression: Am – G – Dm – E7
Each chord is straightforward and basic so that you can focus mostly on the right hand.
Step 2
Chords and 1st string
Once you familiarize yourself with the chords, the best thing to do next is to start practicing the chords along with the first string.
There are three fingers (ring, middle, and index) playing on the same string when you perform the tremolo.
As we want to make this process progressive, you should start by alternating the thumb with the first string (which can be plucked with the index finger only) to get used to the sound.
Check the tab below.
Step 3
The Three Notes Tremolo
Before we get to play the ultimate tremolo pattern, you should spend a little bit of time practicing this simplified version based on three notes (rather than four).
This approach is based on triplets, and the plucking pattern is Thumb, middle, and index finger, so we are not using the ring finger yet.
I find the simple tremolo to be my favorite!
The Ultimate Tremolo
Finally, we will play the ultimate tremolo using the pattern Thumb, ring, middle, and index finger.
Start slowly! The ring fingers will take some practice, so don’t get frustrated.
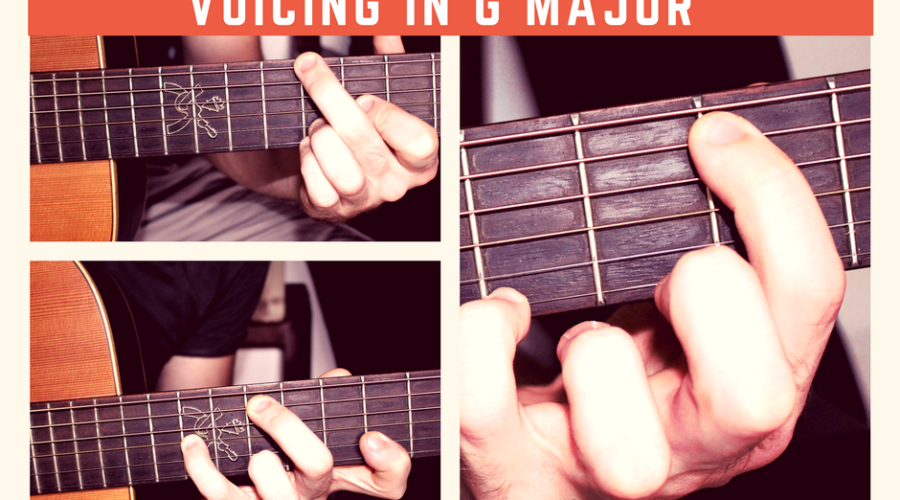
Hey guys, today I want to talk to you about chords and voicing in G major key.
We will be working on a simple chord progression and creating interesting chords that sound different from the basic chords you already know.
The goal is to understand each chord’s intervals so that you can learn the sound of the extensions and reproduce it in different positions.
In this guitar lesson, we are going to play two chords: C major and G major. The extensions will be mainly add9 and add11 chords.
One of the things that really fascinates me is that some of the interesting chords you’ll learn today are actually basic major 7 chords and add9 chords that you might already know, but by twisting the intervals, the chords will sound different.
As always, take things to step by step. Some of these chords are really stretchy, so don’t overstretch your fingers.
Grab your guitar and play along.
Let’s get started.
The Video
Why Interesting Chords?
Why these chords sound so interesting?
The answer is simple: I am mainly playing spread chord triads.
Let me give you an example. Look at the difference between a Gmaj 7 and Gmaj7 spread chord.
The difference is clear!
Chord Progression 1
Cadd9 (#11) – Gadd9
Probably the most common chord progression in G major.
I really like the sound of the C major with the voicing on the F#.
Chord Progression 2
Cmaj7(6) – Gadd11
This is a super progression.
I really like the voicing on the first string for both chords. The Gadd11 is stretchy!
Progression number 3
Cadd9 – Gadd9
Both add9 chords that sound completely different.
Gadd9 is one of my favorite chords.
Progression 4
Cmaj7(add9) – Gmaj7
The most difficult of all the progressions.
The Gmaj7 is very stretchy, going from fret 7 to 12. Take it to step by step.
Progression 5
Cmaj7 – G
The Cmaj7 sounds very interesting with the B open string. Not a chord that you can strum, though.