• Home
  • YouTube Lessons
  • Patreon Courses
  • Buy A Course
  • Meet Marco
  • BlitzGuitar Login
  • Patreon Login
  • Menu
    • Udemy Courses (2018)
    • Free Beginner Guitar Lessons
    • Free Fingerstyle Guitar Lessons
    • Free Fingerpicking Exercises
    • Free Fingerpicking Scales
    • Free Fingerpicking Chords
    • Fingerstyle Questions

marcocirillo@blitzguitar.com

FINGERSTYLE GUITAR LESSONS

With Marco Cirillo
  • Home
  • YouTube Lessons
  • Patreon Courses
  • Buy A Course
  • Meet Marco
  • BlitzGuitar Login
  • Patreon Login
  • Menu
    • Udemy Courses (2018)
    • Free Beginner Guitar Lessons
    • Free Fingerstyle Guitar Lessons
    • Free Fingerpicking Exercises
    • Free Fingerpicking Scales
    • Free Fingerpicking Chords
    • Fingerstyle Questions
The Easiest Spanish Melody On Guitar – Practical Fingerstyle Program

The Easiest Spanish Melody On Guitar – Practical Fingerstyle Program

Jan 18, 2018

The Easiest Spanish Melody on Guitar

Practical Fingerstyle Program

Hello guys and welcome to this awesome fingerstyle guitar lesson.

Today I am going to show you how to play a very simple Spanish melody on guitar so that you can improve your fingerstyle technique and play something musical at the same time.

This lesson is part of my program Practical Fingerstyle, which is a fingerstyle guitar course for beginners.

You can access this program for 7 days free of charge with the All in Monthly Pass.

All the info here.

Do you like this lesson? Access the full Program for Free with the All in Monthly Pass - Info here.

Video Lesson

Spanish Melody from Practical Fingerstyle Program.

What will your Learn

This is the first lesson from the Practical Fingerstyle program available here at BlitzGuitar.com

In this first lesson we are going to work on the right thumb plucking movement.

I believe that if you learn how to position the right hand thumb correctly your plucking fingers (index, middle and ring) will automatically be in place.

Fingerstyle thumb position. Guitar lesson for beginners

In this picture you have a great example of how to position the right hand thumb correctly.

When you start practicing Spanish thumb (which is the lesson on video in this page) you want to make sure your right hand thumb position looks like the one in the picture.

[IMPORTANT] Remember that there is always a 20% of things that you will have to figure out by yourself.

If the position in the picture doesn’t feel right, slightly change the plucking angle to come up with a position that is suitable for your hand.

The Melody

Let’s get into Details

This short song-like exercise can be broken down into three parts.

This is something I recommend a lot when you start practicing a new guitar part.

Divide everything into small chunks.

Bar 1 – 3

This is the part where you will work on your thumb.

The melody is entirely played with the thumb plucking the strings downwards with the side of you thumb.

I always used fingernails so I would pluck with the side of my thumb with a combination of flesh and nail.

Here’s the tab with the first three bars played with the thumb.

Practical Fingerstyle Program - Spanish Thumb. Fingerstyle Guitar Lesson for Beginners

Bar 4 – 11

In this section you will be playing two simple chords on position one: E major and F major 7 chord.

Fingerstyle Guitar Lesson. Practical Fingerstyle Thumb Position

The right hand pattern is very straightforward with the thumb, index and middle (P, i, m) plucking the 4th, 3rd and 2nd string.

Fingertyle acoustic guitar right hand on the strings

If thumb position is correct, you should be able to pluck the strings with a 45 degree angle which will give you control, nice tone and plucking fluidity.

Refer to this picture if you want to learn how to correctly position the thumb and fingers.

The index, middle and ring finger should always pluck the strings with a 45 degree angle with the thumb placed in front of the fingers.


Learn the full Exercise

Access Practical Fingerstyle Now

Do you like this lesson? Access the full Program for Free with the All in Monthly Pass - Info here.

You can access this lesson plus the full program and all the programs available on BlitzGuitar.com with the All in Monthly Pass.

This pass is a monthly membership that allows you to instantly access all the courses on site plus the upcoming lessons.

Take your fingerstyle to the next level.

Do you like this lesson? Access the full Program for Free with the All in Monthly Pass - Info here.

Access all the Courses at blitzgutiar.com. All in monthly pass

Ode to Joy – Ludwig van Beethoven – Fingerstyle Acoustic Guitar Lesson

Ode to Joy – Ludwig van Beethoven – Fingerstyle Acoustic Guitar Lesson

Dec 21, 2017

Ode to Joy – Beethoven

Fingerstyle Acoustic Guitar Lesson

One of my favorite pieces of all time! Ode to Joy by the amazing composer Ludwig van Beethoven.

Today I will show you how to play this beautiful piece in this fingerstyle acoustic guitar lesson for beginners.

Ode to Joy Beethoven Fingerstyle Acoustic Guitar Lesson for BeginnersAs always, we love to do things in a different way here at BlitzGuitar.com, so I put together a lovely intro, which I am going to show you step by step.

You can get the full tab and other classical guitar lessons like this one by joining the BlitzGuitar Academy All in Monthly Pass.

This is a lesson from the Classical Vibe program, where we improve the fingerstyle technique using classical pieces.

All in Monthly Pass. Access this lesson plus another 350 unique fingerstyle guitar lessons.


Ode to Joy Guitar Arrangement

My Fingerstyle Cover of the Song

First thing first, listen to my arrangement of the song.

I came up with a short intro before the main theme starts.

I honestly think that you should always put your ideas in everything you play. One of the most amazing things about music is that you can use it to express your own feelings and state of mind.

Here’s the video

https://www.youtube.com/watch?v=DZUBZ971

Ode to Joy Guitar Lesson

Intro

Let’s get started with the first part of the song. The intro.

When I usually write an intro, I really like to recall the main theme of the song. That technique also helps the listener to get into the song straight away.

I personally love the chord progression at the beginning of the song, as I found it to be quite classical and melodic.

I also mainly play it with block chords. This is an awesome technique that allows you to harmonize simultaneously with chords.

Here’s the fingerstyle lesson with the tab on the screen.

Guitar Block Chords

How to Harmonize with Chords

Just a quick introduction to guitar block chords. When I wrote the intro for Ode to Joy, I really wanted to come up with something that could emphasize the melody.

The problem with a melody like this one is that every note is important, and all of them are played with emphasis.

The red square represents the number of guitar block chords I have been using at the intro’s beginning.

Almost every chord has been harmonized!

Get the Tab here at the BlitzGuitar Academy All in Monthly Pass


Ode to Joy fingerstyle guitar lesson for beginners. BlitzGuitar.com acoustic guitar lesson

Ode to Joy Main Theme

Fingerstyle Video Tutorial

Let’s learn the main theme of Ode to Joy.

The first part of the melody will be played in the first position, so it’s straightforward and enjoyable to play, while the second part is a little bit more challenging as it will be played on position V.

Let’s check the fingerstyle video lesson first.

How to Play the Melody

Tips and Musical Features

There are a few things I want to add before I leave you practicing this beautiful song. It’s such a simple guitar part that needs few expressive tools along the way.

Vibrato

Use guitar vibrato throughout the entire piece. This technique is essential and must be used to sustain the notes and make them “sing” more.

Imagine a singer singing a long note without vibrato! It sounds like he’s yelling, right? That’s because, without vibrato, the note sounds dead and flat.

Even a gentle vibrato is better than nothing, so slowly start applying this technique when you feel like the notes need more sustain.

Right Hand 45 Degree Angle

Another essential thing is the tone you’ll need for this song.

The intro and the main theme are really melodic, so it is best to pluck the strings with a 45-degree angle, which gives a much “rounded” and melodic sound.

Take your time to experiment with the right-hand angle and be patient. It takes time to find the sweet spot!

Left-Hand Fingers Stretch

Some of the chords here a pretty stretchy for the left hand.

This is something you will find quite a lot in the arrangement. I started playing guitar when I was 10 years old, so the left-hand fingers stretch was never a problem for me; however, I understand that some of the chords might be stretchy for some of you.

Take it step by step and use a few exercises to improve your finger’s stretch.

Good luck!

Get the Tab here at the BlitzGuitar Academy All in Monthly Pass


You can become one of my patrons and access a ton of YouTube lessons and tabs.

Become a Patron. Access the tab now!Become a patreon and access the best fingerstyle guitar melody on guitar


The Godfather Music Theme Fingerstyle Guitar Lesson

The Godfather Music Theme Fingerstyle Guitar Lesson

Dec 20, 2017

The Godfather Music Theme

Fingerstyle Guitar Lesson for Beginners

Today I am going to show you one of the most recognized soundtracks of all time.

The Godfather by Francis Coppola Ford Coppola.

I had a lot of fun rearranging this soundtrack, and today, I am going to show you how to play it in fingerstyle guitar.

This acoustic guitar lesson is perfect for beginner guitar players.

Enjoy the lesson.

The Video Lesson

Let’s start with the guitar lessons, so you know how the arrangement sounds like.

There are two different videos for this song on my YouTube Channel.

This one is for beginners as we are only playing the melody and bass note with no chords.

The second video is with melody and chord, and so is more challenging.

I highly recommend you start with the beginner fingerstyle arrangement of the song, so you learn the melody perfectly before moving on to the much more advanced lesson.

Here’s the video.

The Melody

The Godfather Melody

The first part of the melody is in a key of A minor.

This key resonate pretty well with the movie. It’s a story of a New York family crime, so the soundtrack needs to be obscure, funereal, melancholic, serious, and discontent.

Being the mafia boss back in 1945 wasn’t the happiest and enjoyable thing to do, and so the music reflects that feeling throughout the movie.

The Guitar Arrangement

The fingerstyle arrangement is pretty simple, even though the melody is quite “jumpy.”

I highly recommend you start just with the melody and then add the bass note afterward. Almost all the bass notes are open, so they are pretty simple to play.

Let me show you the difference between the bass note and melody.

The yellow color represents the melody, which is pretty busy and “jumpy.”

The red color represents the bass note, which is mainly played with open strings.

The Godfather fingerstyle guitar lesson for beginners.

The Godfather Melody and Chords

Learn this song with chords!

There is also another fingerstyle lesson where I show you the Godfather with melody and chords.

This lesson is more challenging even though much cooler to play.

You can check the video lesson on my YouTube Channel and access the tab on my Patreon Page.

Godfather Guitar Tab

Get the full tab plus the two video lessons of this song here at my Patreon page.

You can become one of my patrons and access a ton of YouTube lessons and tabs.

Become a Patron. Access the tab now!Become a patreon and access the best fingerstyle guitar melody on guitar


Best Fingerstyle Guitar Melody on Guitar – Concierto de Aranjuez – Adagio

Best Fingerstyle Guitar Melody on Guitar – Concierto de Aranjuez – Adagio

Dec 16, 2017

Best Fingerstyle Guitar Melody

Concierto de Aranjuez – Adagio – Fingerstyle Lesson

Part 1

Hey guys, today I will show you how to play what I think is one of the best fingerstyle guitar melodies of all time. I know that we all have different tastes and preferences, but you will agree with me when I say that a beautiful melody is a lovely melody. Period.

Concerto de Aranguez. Best fingerstyle guitar melody. Adagio guitar lessonToday we are checking out the Concierto de Aranjuez by Joaquin Rodrigo, and we will be focusing on the Adagio movement,

This part is slow, melodic, extremely beautiful, and fun to play on classical and acoustic guitar.

I have been teaching it for many years, and people love it.

I wrote a guitar arrangement a while ago, where I tried to combine both guitar and orchestral parts. You will not find the exact guitar part written by Rodrigo, but this arrangement is pretty close to the original and quite easy play.

You will find the tab on the screen and the downloadable pdf on my Patreon page here.

Enjoy this awesome fingerstyle guitar lesson and learn the best fingerstyle guitar melody of all time.

Guitar Lesson Video

Let’s start with the fingerstyle video lesson. Here I am going to show you how to play the first part of the song.

The video is pretty easy to follow, and the tab on the screen helps even more.

I highly recommend you watch the video a couple of times and try to memorize the melody straight away so that you can focus 100% on the melody.

You can download the guitar tab on my Patreon page.

Concierto de Aranjuez TAB part 1

Tab Here

The Guitar Melody

Who thought that the best fingerstyle guitar melody would also be the most melodic one.

When I listen to the Adagio, I can only think of a few other songs played on guitar that can be beautiful and easy to play.

One of the songs I am thinking of is called Recuerdos de la Alhambra by Francisco Tarrega.

There are many beautiful fingerstyle melodies on the guitar, but only a few can capture you as much as the Concierto de Aranjuez.

Interpretation

Another important you will have to focus on when practicing this beautiful melody is the interpretation you want to give.

There are three main aspects you want to focus on.

How to Play the melody

I love to play the melody slowly and with the.

I focus a lot on emphasizing every note differently so that the melody doesn’t sound flat and dull.

It is mainly played quiet (piano), and even when you strum some of the chords, the dynamics never become loud.

One important thing I love to use is to anticipate the bass note before I play the melody. You will notice that I barely play bass and melody simultaneously.

Musical Features

The best fingerstyle guitar melody needs vibrato, melody, and tone.

The vibrato gives more color to the melody and sustains the notes, while the mellow tone, achieved by using a 45-degree plucking angle, is perfect for this melody.

It is pretty simple to give an interpretation of the piece since the moment you start learning it.

Unlike other pieces where you have to learn it before you play it, the Adagio has such a captivating melody that it is almost impossible to “just play the notes.” You must feel like “performing it.”

Concierto de Aranjuez Part 2

Hey guys, the second part of the Concierto de Aranjuez is now available!

This is a video lesson.

Concierto de Aranjuez Part 2 TAB

Tab Here


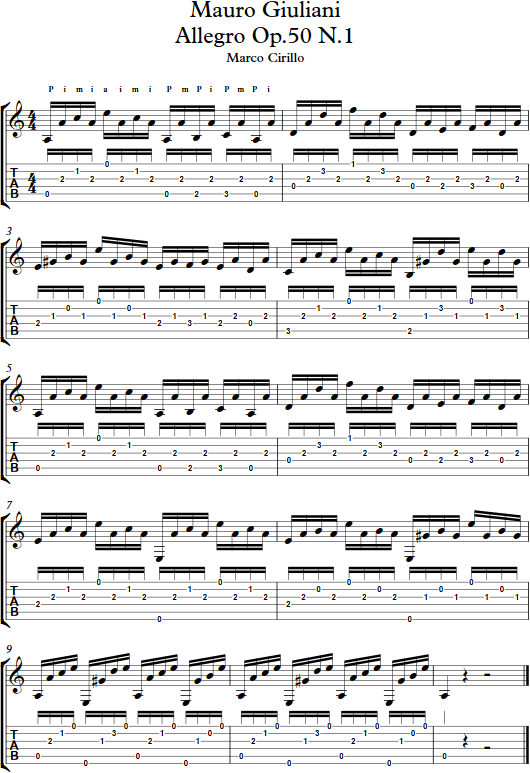
Mauro Giuliani Allegro Op50 N.1 Classical Guitar Lesson. Fingerstyle Guitar Lesson.

Mauro Giuliani Allegro Op50 N.1 Classical Guitar Lesson. Fingerstyle Guitar Lesson.

Dec 15, 2017

Fingerstyle Classical Guitar Lesson

Mauro Giuliani Allegro Op.50 N.1

Hey guys, today I will show you how to play this awesome fingerstyle classical guitar piece that can be played on both classical and acoustic guitar.

The piece is called Allegro, and Mauro Giuliani composed it at the beginning of 1800.

It’s a composition in A minor featuring the famous Giuliani fingerstyle arpeggio, and it is one of the most famous pieces that beginners play on classical and acoustic guitar.

You can get the tab and the video lesson here!

Let’s get started.

Mauro Giuliani Allegro Guitar Lesson

I probably recorded this piece a little bit too fast. Now that I am listening to it, I feel like it’s a little bit too fast, so please, don’t refer to this speed. You can play it way less fast and still be effective and awesome to play.

Right Hand

The fingerstyle pattern used in this fingerstyle classical guitar piece is one of the most famous and used in classical guitar. Mauro Giuliani is a master of this music style, and you will find this type of arpeggios quite a lot in his compositions.

Let’s break it down into a few sections so that you can easily learn it.

There are two different right-hand arpeggios in this song.

  • The Red square is the arpeggio played at the beginning of each bar and is the song’s main fingerstyle pattern. It goes as follows: Thumb, index, middle, index, ring, index, middle, and index. You can also write this arpeggio like that: P i m i a i m me. It would help if you always put more emphasis on the 1st and 5th notes.
  • Yellow Square is much easier to play. You will play a very defined melody with the thumb, followed by a pedal note on the top string. Here the plucking pattern is pretty simple, and it goes as follow: P m P i (Thumb, middle, Thumb, index)

I highly recommend you practice this fingerstyle classical guitar pattern slowly and over one chord only before moving on to the next position.

There are a ton of fingerstyle exercises you can do to improve your technique. Check out some of them here.

Fingerstyle classical guitar mauro giuliani allegrom op50 n1
Left Hand

Chords and Dexterity Improvement

Let’s talk about the left hand and how to play chords and improve your finger’s dexterity.

The chord progression is straightforward, and it goes as follow:

Am – Dm – E – Am – E – Am – Dm – E – Am/E – Esus – E – Am

All the chords are played in position one and will be simple to memorize as they are quite repetitive.

For each chord you are playing there, most of the time, there will be a response on the next bar with a melody on the bass note and a pedal on the top. This only occurs over the first 12 bars right before the coda.

If you struggle with the chord change, I recommend practicing the chord separately without the right-hand arpeggio. Play the chords in pairs for a few minutes before moving on to the next pair.

After the chord change improves, put the chord progression together and add the fingerstyle classical guitar arpeggio that goes with the piece.

Be patient and practice one thing at a time.

Control over speed.

Mauro Giuliani Allegro Guitar Tab

Free Guitar Sheet Music

Allegro Mauro Giuliani Classical guitar lesson. Fingerstyle classical guitar lesson

Final Thoughts

Mauro Giuliani Allegro is one of the best fingerstyle classical guitar arpeggios you will find. This short piece of music has been played millions of times and has helped thousands of guitar players.

Fingers dexterity is one of the most important aspects of your guitar playing, and you should always spend part of your guitar practice working on pieces and exercises that can improve it.

I prefer practicing my fingerstyle technique (and my left hand) with a practical song just like this one. Still, you can also implement a ton of fingerstyle exercises in your playing that is less musical and more mechanical.

You can find a lot of guitar lessons online and interact with a guitar teacher every month.

Everything is good and helpful as long as you keep consistency in your guitar practice.

Take things to step by step and improve your fingerstyle guitar playing.

Good luck, guys.

Acoustic Guitar Challenge. Learn this Fingerstyle Melody in 24 hours.

Acoustic Guitar Challenge. Learn this Fingerstyle Melody in 24 hours.

Dec 13, 2017

Acoustic Guitar Challenge

Fingerstyle Guitar Melody in 24 hours

Hey guys, are you ready for this awesome fingerstyle acoustic guitar challenge? Today I want you to learn this fingerstyle guitar melody for beginners in 24 hours if you can.

Fingerstyle guitar challenge for beginners. Acoustic guitar challenge. Fingerstyle melody.This fingerstyle exercise is a super melodic guitar part that I wrote specifically for this challenge. It’s in a key of E major, and it focuses on a simple melody played using interval scales in 6th.

If you are a fingerstyle guitar beginner ish, I challenge you to learn this fingerstyle melody 24 hours and post the video on our private Facebook group here at the BlitzGuitar Inner Circle Private Facebook Group. 

If you love fingerstyle guitar, take the challenge!

Let’s get started.

Fingerstyle Guitar Melody Video Lesson

Here’s the video lesson. You can get the guitar tab below, but if you prefer the pdf, you can access your BlitzGuitar Account and download it under the “BlitzGuitar Music Lab” tab.

https://www.youtube.com/watch?v=d7JCwrE6rSQ

The Melody

Part 1

We can break the melody down into two sections.

The first part of the melody played with interval scales in 6th follow the E major scale on the first E string, and it’s harmonized with the 6th on the third G string.

Interval scales are a powerful tool that can emphasize the melody and make it stronger and more mellow.

The strings will be pluck simultaneously with index (i) and ring finger (a).

Guitar Tip: Start practicing the interval scale melody without the bass note. 

  • The red color represents the fingerstyle guitar melody played with an interval scale in 6th.
  • The yellow color is a single note melody played with alternate fingering.

Fingerstyle melody acoustic guitar challenge for beginners

Part 2

The second part of this fingerstyle melody challenge is pretty similar and easy to play.

The melody will start again with the same melody, and it will end differently over an E major chord.

The red square represents the most difficult chord in this fingerstyle melody. This C# minor chord is quite stretchy and difficult to pluck. The stretch between the little finger and index finger is pretty wide so take it to step by step.

Acoustic guitar challenge. Fingerstyle guitar melody challenge for beginner.

Advanced Fingerstyle Guitar Arpeggio Exercise

Advanced Fingerstyle Guitar Arpeggio Exercise

Dec 12, 2017

Fingerstyle Guitar Arpeggio

Advance Acoustic Guitar Arpeggio

Hey guys, today I will show you how to play this challenging fingerstyle guitar arpeggio on guitar. This is a lesson from my free ebook Fingerstyle Engine, available here at BlitzGuitar.com. 

Many students have been asking me to post more intermediate/advanced guitar lessons, so I hope you will like this one.

This lesson is called “Arpeggio from Hell,” It’s a combination of the left-hand arpeggio, fingerstyle arpeggio, and fast fingerstyle plucking.

Enjoy this fingerstyle guitar arpeggio, guys!

Let’s get started.

Fingerstyle Arpeggio Video Lesson

This is the full fingerstyle video tutorial. Watch the video several times to familiarize yourself with the exercise.

It is indeed a pretty challenging exercise that requires speed, control, and left-hand fingers stretch.

Tab Here

The Most Difficult Arpeggio I know

The Left Hand Arpeggio

The left hand will perform a bunch of horizontal arpeggios on the 4th string, followed by a scale pattern. This guitar part is pretty jumpy, and it will challenge your left-hand control over slide and stretch.

Practice one arpeggio at a time before moving on to the next one.

What is a Left Hand Guitar Arpeggio?

A left-hand guitar arpeggio is a chord played one note at a time.

A chord is a combination of three or more notes combined. You can decide to play these three notes simultaneously by strumming or plucking the strings. This is probably the easiest way to start.

But you can also play the three notes of a chord individually and call that a left-hand guitar arpeggio.

This is an example of the E minor chord played simultaneously. The three-note that builds the E minor chord is E – G – B. 

Chord Played HorizontallyE minor chord played simultaneously with strumming or fingerstyle

Chord Played Vertically (Arpeggio)

Once you break the chord down and start playing the notes individually on one string, you will come up with a guitar arpeggio that looks like it.

Same note E G B, but this time played horizontally up and down the guitar fretboard.

This is the type of fingerstyle guitar arpeggio we are going to learn today!Fingerstyle guitar arpeggion E minor chord for advanced guitar players

The Chord Progression

We will be applying the concept of fingerstyle guitar arpeggio over these two chords.

E minor and D# diminished chord. Both will be played on the 4th string horizontally.

The E minor Arpeggio

The first arpeggio you are going to play is the E minor on the 4th string. The red square helps you visualize the arpeggio notes, while the yellow square represents the accompaniment.

Each chord is repeated twice.Fingerstyle guitar arpeggio in E minor

The D# Diminished Arpeggio

The D# diminished arpeggio notes are D# – F# – A – C, and it will be played on the 4th string horizontally. 

Here is the D# fingerstyle arpeggio.

D diminished guitar arpeggio on fingerstyle guitar.Scale Pattern on One String

After the two arpeggios, we will be focusing on a scale pattern played on the 4th string. This is one of the things I love to play the most. Scale patterns are the best way to develop your technique, control, and strength.

I highly recommend you practice this part slowly. It will take a little bit of time before you can fluently play it, so be consistent and patient.

The scale pattern will be played with the thumb while the fingers will focus on the first string’s accompaniment.

Fingerstyle scale patter on one string. Fingerstyle guitar lesson

The Last Arpeggio

You can then finish the exercise with the E minor arpeggio played in position one. This arpeggio is much easier than the first one as it is played vertically in one position.

Check it out down below.

E minor verical arpeggio on Guitar

Fingerstyle Thumb Position. How to Position the Thumb for Best Plucking!

Fingerstyle Thumb Position. How to Position the Thumb for Best Plucking!

Dec 9, 2017

Fingerstyle Thumb Position

How to pluck the strings with the thumb

Hey people, today I am going to talk to you about fingerstyle guitar and thumb position.

Any guitar player can develop a good fingerstyle thumb position with practice and patient. I will share a few tips to help you with fingerstyle guitar, plucking thumb, musicality, tone, control, and dynamics.

I honestly think that the thumb is responsible for giving you the correct right-hand position. Learning how to position the thumb correctly will drastically improve your finger’s position.

Let’s get started!

The Right-hand Thumb

The angle

The right-hand thumb is a quite busy finger, and it will usually pluck more than one string. It usually plucks the guitar’s bottom three strings (4th, 5th, and 6th string). His job is to provide bass notes, rhythm, and sometimes strumming.

You must follow three things to position the thumb correctly and improve your plucking, articulation, and volume.

  • Assign a string for each finger. The thumb will cover the bottom three strings.
  • Keep the thumb in front of the fingers so that it is easy to pluck downward without clashing with the index.
  • I suggest you also try to pluck the string with the side of your thumb for a better tone.

Because the thumb will always pluck downward, it is crucial to position it so that it doesn’t clash with the index finger. It will also be essential to keep it in front of the fingers to articulate and give you volume and dynamics.

Check the picture below to learn what I think is the best thumb position for fingerstyle guitar. Remember, though, that you might have to adjust the thumb position considering your fingers and posture.

Take it to step by step and give your fingers time to adjust to the new position. 
Fingerstyle thumb position. Guitar lesson for beginners

Thumb and Nails

One of the questions I get asked the most is whether or not your need nails to play guitar using the fingerstyle technique. Most of the time, guitar players are much more concerned about how their hands will look rather than the quality of the sound.

Nails are essential but are not essential, and you can play fingerstyle guitar without them.

I started playing guitar when I was 10 years old, and I’ve always used nails to play, so I can’t really play anything without them, but there are so many examples of fingerstyle guitar players who don’t use nails, and they have a great sound, tone, and volume.

I usually say, try different things!

Start without and then grow just a little bit on your thumb to see if you feel a difference in tone and sound. If you like it and you can get over the fact that you have longer nails on the one hand only, keep it and enjoy the sound.

Down below, we are checking out one of the greatest acoustic guitar players of all time, Tommy Emmanuel. He doesn’t use nails, but he sounds great.

Notice his thumb position, which is in front of the fingers and

Thumb and Fingers

Awesome, so you are getting familiar with the thumb position. The good news is that once your right-hand thumb is positioned correctly, it will also help the fingers to achieve a better plucking angle.

Fingertyle acoustic guitar right hand on the stringsIf you check this picture, you will notice that the fingers follow a 45-degree angle perfect for plucking and fluidity.

The 45-degree angle is almost impossible if the thumb is not in the right position.

You will have to find the right balance between thumb and fingers. Considering how long you have been playing, it might be difficult to quickly adjust the finger’s position.

I recommend you practice few fingerstyle exercises that can help you slowly readjusting your right-hand fingers and thumb so that you can get the most out of your technique.

Learn from the Best!

Analyzing Fingerstyle Guitar Players

One thing essential that everyone should do is analyzing fingerstyle guitar players and see how they play.

The awesome thing is about analyzing guitar players. Nowadays, we have access to a ton of videos and different resources that allow you to compare, learn, and finally implement new techniques in your fingerstyle playing.

Let’s get started.

Estas Tonne Thumb Position

Estas Tonne is an awesome fingerstyle guitar player from Ukraine. His style is a combination of Spanish flamenco, Gypsy, Latin and modern music.

Estas Tonne fingerstyle guitar thumb positionSome of his videos have reached millions of views on YouTube, and he’s constantly traveling around the world to promote his music.

If you start analyzing this guitar player, you will notice that his thumb position follows the two rules we learned today. 1) Thumb in front of the fingers. 2) Plucking the strings with the side of his thumb.


John Williams

Few classical guitar players are so devoted to one style of music, and one of these is John Williams.

John Williams fingerstyle guitar player. Thumb position and plucking thumb fingerstyleWilliams has been playing guitar since the age of 11 and won a Grammy Award in 1973.

He’s a completely different guitar player than Estas Tonne, but they share the same right-hand thumb position.

Notice how his thumb is positioned in front of the fingers.

John Williams also uses nails, which allows him to have control, volume, and dynamics.

Another awesome example to follow.


Thumb Position to avoid.

Overusing the thumb

Some guitar players tend to use the thumb too much. They start plucking the strings with the thumb and use the fingers only when it’s necessary.

Overusing the thumb is never a good choice. Instead, use the Thumb (p) index (i) middle (m) and ring (a) together since the day you start playing guitar. The fingers must work together!

Thumb Behind the Fingers

Don’t ever position your thumb behind the fingers. This is probably one of the most difficult bad habits to break.

Thumb behind the fingers how not to pluck the strings. Acoustic guitar lesson.So many beginner guitar players start playing guitar, curling the thumb behind the fingers. Instead, position the thumb towards the fretting hand.

Conclusion

The thumb position is one of the most important aspects you have to focus on when it comes to fingerstyle guitar.

The balance between thumb and fingers must be perfect so that you can pluck with strings with control and confidence. It isn’t easy to develop the correct right-hand position, but with a few exercises and consistency, you should quickly achieve good control.

I have a few exercises that can help you with that.

Best Chord on Guitar. The Add9 Chord on Fingerstyle Acoustic Guitar

Best Chord on Guitar. The Add9 Chord on Fingerstyle Acoustic Guitar

Dec 8, 2017

Best Guitar Chord

The add9 Chord on Guitar

Today I want to talk to you about what I think is the “Best Guitar Chord.” When I say the best chord, I mean the one I like the most in terms of sound and musicality.

In this fingerstyle guitar lesson, we will analyze this awesome guitar chord and learn how to play it on guitar using these awesome and practical acoustic guitar lessons.

Before we get started, remember that you can learn more about fingerstyle acoustic guitar by reading this article I wrote a while ago!

Let’s get started.

Best Guitar Chord Video Lesson

As always, let me start by showing you the guitar lesson here. Watch the beginning of the video several times to familiarize yourself with the guitar part, grab your guitar, and start learning.

Here’s the fingerstyle video tutorial.

The Add9 Chord

What is it, and how it looks like

The add9 chord on the guitar can be played in many different ways, and each shape will give you a different tone and vibe. The reason why I think it’s the best guitar chord is because of its shape and sound.

Let me show you the add9 guitar chord we are learning today.

Best Guitar Chord on Guitar. Acoustic Guitar Add9 Chord

As you notice from the picture, this guitar chord is pretty stretchy, and it will take a while before you can play it fluently.

Notes and Intervals

In the picture, there are three numbers. Each number is the note that we need to build the chord.

The index fingers will play the root note (number 1), the middle finger the 5th (number 5), and the little finger will play the 9th (number 9).

It is indeed a fundamental chord based on three notes.

Fingers and Stretch

The fingers we are using are the index, middle and little fingers.

  • The index finger represents the root note, and it will give you the name of the chord. If you place the index finger on the 5th string, fret three, you play a Cadd9 chord.
  • The middle finger will always be placed one string below, two frets up. You will probably feel the stretch between the index and middle finger at the beginning. keep practicing, and your fingers will get used to it.
  • The little finger is positioned one string below the middle finger two frets up. The stretch between the index and little finger is pretty extreme, and it will take time and patience. Don’t give up!

Add9 Chord on Acoustic Guitar. Fingerstyle Guitar Lesson.

Let me also show how the best guitar chord looks like on the diagram.

I honestly think this is one of the easiest chords to memorize as its shape is simple and symmetrical.

Time to move on to the guitar tab.

Guitar Tab

Best Guitar Chord on Guitar

Now that you are more familiar with the Add9 chord shape, it’s time to learn the fingerstyle exercise that will help you put this guitar chord into practice.

There are two steps I suggest you follow!

Step 1

Memorize the chord shape

The first step is to memorize the chord progression and the chord shape you are about to play. The cool thing about the add9 chord is that it follows the same shape no matter which chord you are playing.

The chord progression is this one: Eadd9 – C#madd9 – Aadd9 – Badd9.

You can play this chord progression using the same shape for the add9 chord and move it up and down the neck, considering each chord’s root note.

Let me show you how to do that with the chord diagrams.


Step 2

Add9 Chord and Melody

The second step will be to add the melody to the add9 chord progression you just learned. This part is more challenging as you will be playing the melody between the chords.

Let me show you the guitar tab here.

Add9 chord on guitar. Fingerstyle acoustic guitar.
Putting it together

Few words about the exercise and how to put it together.

I highly recommend you really practice everything slowly and step by step. I know that we are always tempted to learn new things as quickly as possible but trust me, the add9 chord is pretty stretchy and challenging, so always give your left fingers the time to adjust to the stretch.

The most important thing you want to try to achieve when practicing this exercise is the Over-Ringing technique. It would help if you always let each chord ringing out nicely to give more musicality and feel to the whole thing.

Last but not least, focus a lot on dynamics and performance. As you probably notice, these lessons are not just basic exercises but rather practical short pieces. Perform them and make me the happiest!


Easy Fingerstyle Melody for Beginners. Acoustic Guitar Lesson!

Easy Fingerstyle Melody for Beginners. Acoustic Guitar Lesson!

Dec 7, 2017

Easy Fingerstyle Melody for Beginners

Dark Ages Symphony

Today I want to show you this easy fingerstyle melody for beginners called Dark Ages Symphony. I was

GoodFingerstyle Melody for Beginners. Learn fingerstyle acoustic guitar online

inspired by a soundtrack I was listening to a while ago for a documentary on the Dark Ages, Medieval period between the 5th and 15th Century.

The melody is easy but also challenging as we will play it on two different octaves.

This is the perfect fingerstyle melody for beginners, so start with this lesson if you want to familiarize yourself with fingerstyle acoustic guitar. 

Let’s get started.

Fingerstyle Melody – Video Lesson

As always, let’s start with the video lesson to have an idea of what we are going to learn. You can also have access to the tab 100% free as this is part of the BlitzGuitar Melody lab program.

The melody

Fingerstyle Guitar Lesson for Beginners

Let’s talk about the fingerstyle melody you are about to learn. The idea was to create a straightforward melody that could be played on two octaves.

The first octave based on the first position of the guitar will be played within the first three frets of the fingerboard, and it’s pretty simple. The second octave is more challenging, and even though it is the same rhythmic and melodic part, it will require more practice to become fluent.

The fingerstyle pattern is also pretty straightforward.

The melody, highlighted with the red color, will be played with the fingerstyle technique, always using alternate fingering (index and middle finger).

The bass note, which is in yellow color, will be played with the thumb with no exceptions.

Acoustic Guitar Melody and Bass note Fingerstyle guitar lesson


Fingerstyle Melody on Different Octave

Fingerstyle Acoustic Guitar

Once you become familiar with the first part of the fingerstyle melody, you should then move on to the second part of this exercise, played on a different octave.

The melody will now start on the 10th fret of the second string, and the entire melody will be played in that position. Even though it might sound challenging, I am pretty confident you will easily play this guitar part!

As you already learned the first octave, playing the same melody one octave higher shouldn’t be too difficult. The rhythm is the same, so it’s all about left-hand finger movement and fingerstyle.

Here’s the second part of the melody!

Notice that the only thing that is different from the first part of the melody is the last two bars.

Fingerstyle melody on different octave. Acoustic gutiar lesson for beginners.

How to Practice

Fingerstyle Guitar Tips

Let me give you a few guitar tips that can help you practicing this exercise correctly so that you can make the most out of your guitar practice and really nail this exercise as quickly as possible.

Practicing fingerstyle guitar isn’t about piling up hours of practice. You can play guitar for as many hours as you can, but if you don’t have the right method, you will probably end up wasting a lot of time.

Step 1 – Start with the Melody

Steps by Step Guitar Practice!

The first awesome thing we can do when you start practicing this exercise could be focusing on the melody only. You can easily avoid the bass note and play just the top melody with alternate fingering.

This is indeed the perfect way to start learning any guitar part of the fingerstyle melody.

By breaking it down into sections, you will focus on one element at a time and learn the melody step by step.

Step 2 – Bass note and Harmony

Guitar, Fingerstyle, and Chords.

For the next step, we are going to add one guitar part at a time. Usually, after I learned the fingerstyle melody, I start by adding the bass note. Now I can hear the melody much better, with the bass note giving me the harmony!

Usually, adding the bass note shouldn’t be difficult. However, it could be challenging at the beginning to give grove and flow to the melody. Keep practicing slowly and keep trying for a few days. You will get better.

At that stage, I am not quite focusing on the rhythm yet. Take your time learning the melody and bass, then move on to step 3 and add the rhythm.

Step 3 – Add Rhythm

Putting it Together

The last step would be adding the rhythm and any other musical feature that this melody needs. This is the step that every guitar player enjoys the most. With the rhythm, the song becomes more musical and fun to play. It also feels good to perform the exercise finally.

Step 3 is highly motivating and extremely important if you want to build momentum and drive.

Now you should spend a little bit of time enjoying playing this exercise and evaluate your progress. It’s now time to grab the next exercise and make some improvements in your fingerstyle guitar playing.

Learning guitar is a process that never ends.

Keep learning and pushing forwards.

Good luck, guys.

  • 1
  • 2
  • …
  • 48
  • 49
  • 50
Check my Premium Lessons on Patreon!
Acoustic Steps Fingerstyle Guitar Book

Privacy Policy

Cookie Policy

Terms and Conditions

© Copyright 2021 BlitzGuitar.com

  • Home
  • YouTube Lessons
  • Patreon Courses
  • Buy A Course
  • Meet Marco
  • BlitzGuitar Login
  • Patreon Login
  • Menu
    • Udemy Courses (2018)
    • Free Beginner Guitar Lessons
    • Free Fingerstyle Guitar Lessons
    • Free Fingerpicking Exercises
    • Free Fingerpicking Scales
    • Free Fingerpicking Chords
    • Fingerstyle Questions